No edit summary |
|||
| Line 7: | Line 7: | ||
===Initial Idea=== | ===Initial Idea=== | ||
[[File:real-drum-set.png| | [[File:real-drum-set.png|200px]] | ||
[[File:small-drum-set.png| | [[File:small-drum-set.png|200px]] | ||
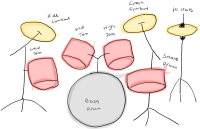
The picture on the right is the initial sketch of the drum set. Each piece is color-coded to its equivalent drum in a set depicted in the left picture; all toms and the snare in red while all cymbals and the hi-hat in yellow. The two blue circles were drawn to represent the tap buttons for pedal movements which manipulates the bass drum and the hi-hat. | The picture on the right is the initial sketch of the drum set. Each piece is color-coded to its equivalent drum in a set depicted in the left picture; all toms and the snare in red while all cymbals and the hi-hat in yellow. The two blue circles were drawn to represent the tap buttons for pedal movements which manipulates the bass drum and the hi-hat. | ||
As shown in the sketch, I planned to recycle the materials that can be found easily. For example, wine corks for toms and the snare, and beer caps for cymbals and the hi-hat, and finally a metal box with a piezo mic attached inside which becomes the platform for all the drums. | As shown in the sketch, I planned to recycle the materials that can be found easily. For example, wine corks for toms and the snare, and beer caps for cymbals and the hi-hat, and finally a metal box with a piezo mic attached inside which becomes the platform for all the drums. | ||
Here are the steps how I thought it should work in the beginning. | Here are the steps how I thought it should work in the beginning. | ||
1. The user taps on the drum. | 1. The user taps on the drum. | ||
2. The piezo mic grabs the sound. | 2. The piezo mic grabs the sound. | ||
3. The program detects the unique frequency of the sound. | 3. The program detects the unique frequency of the sound. | ||
4. An equivalent drum sound is produced. | 4. An equivalent drum sound is produced. | ||
Following challenges immediately arose. | Following challenges immediately arose. | ||
- How to ensure the sounds being fed are unique enough to be classified into different patterns? | - How to ensure the sounds being fed are unique enough to be classified into different patterns? | ||
- How to realize pedal movements? | - How to realize pedal movements? | ||
- How to allow multiple drums to be detected and played? | - How to allow multiple drums to be detected and played? | ||
- How to map the intensity and lasting of each output sound to the input sound? Would the texture of materials matter? | - How to map the intensity and lasting of each output sound to the input sound? Would the texture of materials matter? | ||
| Line 29: | Line 38: | ||
====Preparing the Instruments==== | ====Preparing the Instruments==== | ||
[[File:2019-10-04 17.30.jpeg| | [[File:2019-10-04 17.30.jpeg|200px]] | ||
Before the playback, the timbreID must be trained with sounds that are timbrally different to one another. In the initial setup, there were only 4 classifications available, but I added two more. To produce timbrally different and sounds, I used various materials from beer caps to wine corks as planned. Also to make sharp and short-duration sounds, I decided to use the metal chopsticks to tap with, rather than with fingers which was my original plan. With some experiments, I found the combination that worked somewhat well. | Before the playback, the timbreID must be trained with sounds that are timbrally different to one another. In the initial setup, there were only 4 classifications available, but I added two more. To produce timbrally different and sounds, I used various materials from beer caps to wine corks as planned. Also to make sharp and short-duration sounds, I decided to use the metal chopsticks to tap with, rather than with fingers which was my original plan. With some experiments, I found the combination that worked somewhat well. | ||
====Training==== | ====Training==== | ||
[[:File:training-final.mp4]] | video link: [[:File:training-final.mp4]] | ||
To train, “train” spigot should be turned on. Input sounds are made by tapping on different objects for 5-10 times. Here I am tapping each instrument about 10 times. Each input are shown in the Pd’s window. | To train, “train” spigot should be turned on. Input sounds are made by tapping on different objects for 5-10 times. Here I am tapping each instrument about 10 times. Each input are shown in the Pd’s window. | ||
[[File:2019-10-05 19.10.gif| | [[File:2019-10-05 19.10.gif|200px]] | ||
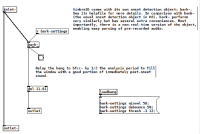
What happens here is that they are detected by ‘bark~’ in the ‘pd onsets’ sub-patch, which measures the amount of growth in bands of an input’s spectrum. Here I lowered the debounce setting to 50 ms for which it will be deaf. It was set as high as 200ms initially to prevent the sample playback to retrigger the playback, but it could be lowered to play in a bit quicker rythme by using the headphones. | What happens here is that they are detected by ‘bark~’ in the ‘pd onsets’ sub-patch, which measures the amount of growth in bands of an input’s spectrum. Here I lowered the debounce setting to 50 ms for which it will be deaf. It was set as high as 200ms initially to prevent the sample playback to retrigger the playback, but it could be lowered to play in a bit quicker rythme by using the headphones. | ||
[[File:bark.png| | |||
[[File:bark.png|200px]] | |||
One more thing to note here is that the master volume should be mute as the feedback sample output will be included in the training input. After training, the ‘train’ spigot should be turned off again. | One more thing to note here is that the master volume should be mute as the feedback sample output will be included in the training input. After training, the ‘train’ spigot should be turned off again. | ||
The training dataset can be saved with the ‘write’ message and can be read again with the ‘read’ message. I added additional write and read messages for backup. | The training dataset can be saved with the ‘write’ message and can be read again with the ‘read’ message. I added additional write and read messages for backup. | ||
====Clustering==== | ====Clustering==== | ||
[[File:clustering.png| | [[File:clustering.png|200px]] | ||
[[File:window.png| | [[File:window.png|200px]] | ||
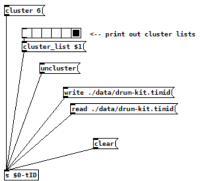
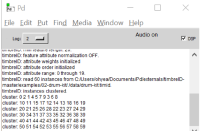
After training, the input sounds should be grouped by different timbral sounds with the ‘cluster’ message. Here I changed the number of cluster items from 4 to 6. Each cluster can be printed out in the Pd’s window with the radio buttons connected to the ‘cluster list’. The numbers represent the members based on the input order, starting from 0. | After training, the input sounds should be grouped by different timbral sounds with the ‘cluster’ message. Here I changed the number of cluster items from 4 to 6. Each cluster can be printed out in the Pd’s window with the radio buttons connected to the ‘cluster list’. The numbers represent the members based on the input order, starting from 0. | ||
====Playing==== | ====Playing==== | ||
[[File:2019-10-05 19.18.mov]] | [[File:2019-10-05 19.18.mov]] | ||
Finally you can play the instruments by hitting one by one. This is because there is only one input channel at the moment. Notice how different instrument lead to playback of different sample. Here what happens is that the program tries to find the set of data previously trained that best matches the input sound. When the ‘id’ spigot is turned on, the cluster number will be printed out on the Pd’s window whenever the sample is played back. | Finally you can play the instruments by hitting one by one. This is because there is only one input channel at the moment. Notice how different instrument lead to playback of different sample. Here what happens is that the program tries to find the set of data previously trained that best matches the input sound. When the ‘id’ spigot is turned on, the cluster number will be printed out on the Pd’s window whenever the sample is played back. | ||
For the playback, I loaded my own drum samples to fit my mini drum set-up. | For the playback, I loaded my own drum samples to fit my mini drum set-up. | ||
I got each audio sample from the SampleSwap[https://sampleswap.org/filebrowser-new.php?d=DRUMS+%28FULL+KITS%29%2FDRUM+MACHINES%2F], an audio sample sharing site. Then I put them together into one audio file with even 1s interval, for it to be processed in the Pd. | I got each audio sample from the SampleSwap[https://sampleswap.org/filebrowser-new.php?d=DRUMS+%28FULL+KITS%29%2FDRUM+MACHINES%2F], an audio sample sharing site. Then I put them together into one audio file with even 1s interval, for it to be processed in the Pd. | ||
[[File:sampleswap.PNG| | |||
[[File:sampleswap.PNG|200px]] | |||
To add sample items, I also had to change the array ‘drum-kit-times’ as such. | To add sample items, I also had to change the array ‘drum-kit-times’ as such. | ||
Here is the final audio file: [[:File:drum-kit.wav]] | Here is the final audio file: [[:File:drum-kit.wav]] | ||
This example also has a functionality to record sequences. It is pretty straightforward to use; toggle recording by ‘record-on-off’ button and adjust tempo with the slider while playing it. | This example also has a functionality to record sequences. It is pretty straightforward to use; toggle recording by ‘record-on-off’ button and adjust tempo with the slider while playing it. | ||
Revision as of 22:19, 5 October 2019
Mini Electronic Drum Set
A tiny little drum made by clustering and mapping the sounds
Motivation
The idea was to recreate a small and simple version of a drum kit, where the sounds are processed electronically to be mapped to a corresponding drum sounds. The motivation came from the fact that I have recently started to learn to play drums and potentially use this small set to practice drumming at home with headphones on, while not having to disturb anyone (which turned out to be a naive speculation).
Initial Idea
The picture on the right is the initial sketch of the drum set. Each piece is color-coded to its equivalent drum in a set depicted in the left picture; all toms and the snare in red while all cymbals and the hi-hat in yellow. The two blue circles were drawn to represent the tap buttons for pedal movements which manipulates the bass drum and the hi-hat.
As shown in the sketch, I planned to recycle the materials that can be found easily. For example, wine corks for toms and the snare, and beer caps for cymbals and the hi-hat, and finally a metal box with a piezo mic attached inside which becomes the platform for all the drums.
Here are the steps how I thought it should work in the beginning.
1. The user taps on the drum.
2. The piezo mic grabs the sound.
3. The program detects the unique frequency of the sound.
4. An equivalent drum sound is produced.
Following challenges immediately arose.
- How to ensure the sounds being fed are unique enough to be classified into different patterns?
- How to realize pedal movements?
- How to allow multiple drums to be detected and played?
- How to map the intensity and lasting of each output sound to the input sound? Would the texture of materials matter?
Implementation
I used the timbreID[1], a library for analyzing audio feature in Pure Data(Pd). In particular, its drum kit example already had the function to map the sample drum sounds to the real-time input sounds.
Preparing the Instruments
 Before the playback, the timbreID must be trained with sounds that are timbrally different to one another. In the initial setup, there were only 4 classifications available, but I added two more. To produce timbrally different and sounds, I used various materials from beer caps to wine corks as planned. Also to make sharp and short-duration sounds, I decided to use the metal chopsticks to tap with, rather than with fingers which was my original plan. With some experiments, I found the combination that worked somewhat well.
Training
video link: File:training-final.mp4
To train, “train” spigot should be turned on. Input sounds are made by tapping on different objects for 5-10 times. Here I am tapping each instrument about 10 times. Each input are shown in the Pd’s window.
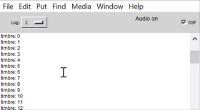
What happens here is that they are detected by ‘bark~’ in the ‘pd onsets’ sub-patch, which measures the amount of growth in bands of an input’s spectrum. Here I lowered the debounce setting to 50 ms for which it will be deaf. It was set as high as 200ms initially to prevent the sample playback to retrigger the playback, but it could be lowered to play in a bit quicker rythme by using the headphones.
One more thing to note here is that the master volume should be mute as the feedback sample output will be included in the training input. After training, the ‘train’ spigot should be turned off again. The training dataset can be saved with the ‘write’ message and can be read again with the ‘read’ message. I added additional write and read messages for backup.
Clustering
After training, the input sounds should be grouped by different timbral sounds with the ‘cluster’ message. Here I changed the number of cluster items from 4 to 6. Each cluster can be printed out in the Pd’s window with the radio buttons connected to the ‘cluster list’. The numbers represent the members based on the input order, starting from 0.
Playing
Finally you can play the instruments by hitting one by one. This is because there is only one input channel at the moment. Notice how different instrument lead to playback of different sample. Here what happens is that the program tries to find the set of data previously trained that best matches the input sound. When the ‘id’ spigot is turned on, the cluster number will be printed out on the Pd’s window whenever the sample is played back. For the playback, I loaded my own drum samples to fit my mini drum set-up. I got each audio sample from the SampleSwap[2], an audio sample sharing site. Then I put them together into one audio file with even 1s interval, for it to be processed in the Pd.
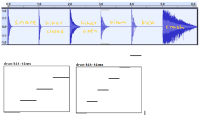
Here is the final audio file: File:drum-kit.wav
This example also has a functionality to record sequences. It is pretty straightforward to use; toggle recording by ‘record-on-off’ button and adjust tempo with the slider while playing it.
Limitations
- Limited Timbral Differences
Even with an effort to find materials with different enough textures to produce unique audio when tapped, some materials tend to fall into the same category of sounds. For example, the aluminium lid and the plastic gum container that I used for crash cymbal and open hi-hat respectively, sometimes were recognized to be in the same category. Obviously, classification gets more accurate as the number of audio items reduces. For this reason, I had to reduce the number of items, omitting the kick sound.
- Lack of Pedal Movements
This drum set, while being cute, cannot fully be used for practice because its missing pedals. I initially thought of introducing them by thumb tapping, but noticed that two thumb tap sounds would have exact same timbral sound and cannot be distinguished with the current single input setting. In the end, I realized it by attaching a wide aluminium juice lid onto the slipper and register the sound by tapping on the foot, but it cannot be used with the piezo mic setting which is a huge disadvantage.
- Singularity of an Input Sound
Obviously, one of the biggest limitation when it comes to practicality is the fact that it can only process one sound at a time. Because you cannot play multiple drums at a time with some inherent latency in playback, it cannot quite produce useful beat in the end. This problem can be solved by introducing multiple piezo mics and feeding the inputs into different Pd programs.
- Lack of Ubiquity
Due to the lack of time and technical issues, I had to process the patch on my laptop. It could have better fit the overall purpose of the course if I could utilize the Raspberry Pi, in the sense of ubiquity and collaboration of embedded systems. This can been done by installing the pd patch in a Raspberry Pi where the piezo mic is connected to its sound card, along with some sort of sound output device.
