No edit summary |
m (intermediate edit still work in progress) Tag: 2017 source edit |
||
| (One intermediate revision by one other user not shown) | |||
| Line 37: | Line 37: | ||
(Not finished yet) | (Not finished yet) | ||
=== Making Leaf Prints === | |||
I first learned about photosynthesis photography through a video from the YouTube channel [https://www.youtube.com/watch?v=-qETedzsFIE Applied Science], which inspired me to try it myself. The guide outlines the process in four steps: exposing the plant, clearing the leaf, developing the leaf, and drying/conserving the leaf. | |||
=== Exposing === | |||
[[File:1paperclip.jpg|frameless|thumb|Negatives held by paper clips|533x400px]] | |||
[[File:2metalmesh.jpg|frameless|thumb|Negatives held by contraption|533x400px]] | |||
Exposure is central to photography. It involves selecting a subject and composing an image to be captured on photosensitive film, or in this case, a leaf. The aim is to capture anything that appears in front of our camera, but we'll start with contact exposure. Contact exposure entails using an object or subject to block light hitting the film/leaf, creating an image. This can involve letter cutouts, silhouette shapes, or an existing photo negative. To experiment, I took several portraits with a medium format camera, which simply means the negatives are larger, about 6x6 cm in size. Initially, I used paperclips to attach the negatives to the leaves, but later I changed to a setup involving a metal mesh backing and a glass plate in front, sandwiching the photo negative between the glass and the leaf for detailed imprints. | |||
Choosing the right plant is crucial. The video I followed used a geranium, likely due to its well-documented starch formation. Without access to a geranium, I opted for a Cyclamen, noting its similarly thick leaves. I also experimented with other plants, like pothos (Epipremnum aureum). Unlike conventional photography, where exposure times are fractions of seconds, this method requires hours, aligning with the natural rhythm of the sun that plants are adapted to. You can place the prepared leaves in a sunny spot or under grow lights controlled by a timer for over 7 hours of quality light. Alternatively, projecting an image onto a leaf with a light projector for about half an hour can also yield good results. | |||
=== Clearing === | |||
[[File:3clear1.jpg|frameless|thumb|Leaves in ethanol|533x400px]] | |||
[[File:4clear2.jpg|frameless|thumb|Leaves almost fully cleared|533x400px]] | |||
The next step is the clearing of the leaf. A leaf serves many functions in a plant, but for our purposes in photography, we need a structure that suspends the colored starch molecules in something clear to provide good contrast. To prepare the leaf accordingly, we aim to remove any elements that obstruct this clarity, including the chloroplasts that give the leaf its green color and enable starch formation to begin with. After they've fulfilled their role, preventing further starch formation is crucial to maintain the image. | |||
To achieve this, I soaked the leaves in ethanol, the type you can buy for cleaning or camping stoves, for a few days. The video presented several options, including boiling the leaf in methanol, ethanol, and propanol. Boiling in methanol yielded the best results there, but considering its potential health and fire hazards, I sought an alternative. | |||
The soaking method worked well for the Cyclamen, but for the pothos, it created brown spots that rendered it unusable. However, cooking it in ethanol for about 20 minutes was effective. It's important to be cautious during this process to avoid accidentally setting it on fire and to keep the vapors contained, either with a lid or something that allows them to condense. | |||
After this treatment, the ethanol turns green, and the leaf becomes white and very fragile to the touch. To prepare the leaf for the developing/coloring step, I let it soak in water until it regains the flexibility of a leaf again. | |||
=== Developing === | |||
Now, we arrive at the most exciting step: making the starch visible. We use Lugol's iodine solution, invented by a French doctor two hundred years ago and utilized for various purposes. This reddish liquid turns starch a very deep blue/black upon contact. We allow the leaf to soak in a bath of this solution until it's fully saturated and the solution has had enough time to permeate every cell of the leaf. This process usually takes about thirty minutes to an hour, resulting in the leaf adopting the color of the solution. | |||
Next, we need to clear the leaf of the excess Lugol's solution left over after coloring the starch. Another soak in water should do the trick; this is when we can see the images for the first time. If satisfied with the clearing of the leaf, which typically involves multiple water changes over a few hours, I then take the leaves out for drying. | |||
=== Drying === | |||
The drying step is fairly straightforward. Simply place the leaves in tissues under a stack of books and let them sit for a few days. However, it's important to ensure that the tissues don't contain starch, as residual Lugol's solution could react with it and stain the leaves. A quick test with a few drops of the solution on the tissues can confirm their suitability. | |||
During drying, the leaf may shrink significantly, but I suspect that applying more pressure with additional weight on top could mitigate this shrinkage. | |||
And there you have it: small leaf prints and a procedure that might help us to repurpose the camera. | |||
=== Adapting the Process === | |||
To integrate this process with a camera, we need to modify the exposure step—the act of taking the photo. Contact exposure previously offered a lot of freedom, including abundant light and the ability to directly use an already captured image. However, using a plate camera introduces new considerations. This type of camera involves inserting slim casings that hold photographic film or plates into the camera, followed by the removal of a metal plate to expose the photosensitive material. After exposure, the metal plate is reinserted, and the casing is removed, only to be opened in a darkroom to prevent accidental exposure. | |||
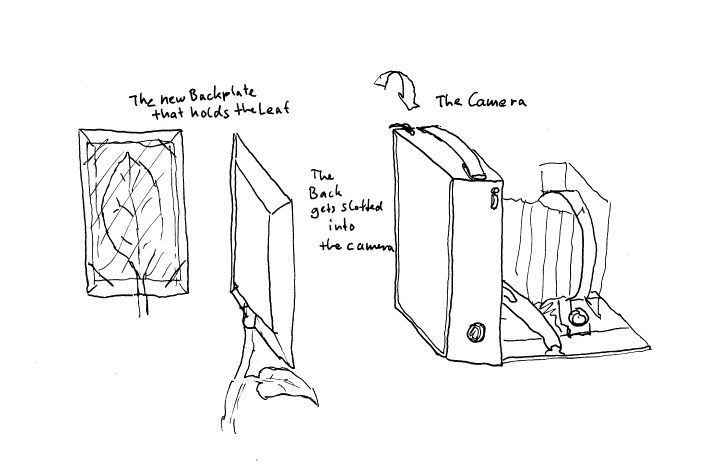
Given that a leaf is significantly less sensitive to light, we don't need to be as concerned about light leaks and accidental exposures. For the duration of the photo capture, the leaf must be mounted inside the camera at the focal plane, exposed to light only through the camera's lens. To achieve this, I 3D printed a module that fits into the slot normally used for the film casings. This module holds the leaf flat against the focal plane, with the leaf's stem extending out the back and remaining attached to the plant. To maximize the chances of capturing a good image, we should select a subject with strong contrast and lighting, acknowledging that the leaf will receive significantly less light compared to the contact exposure method. | |||
# | |||
=== Conclusion === | |||
This is a layman's attempt to create a bridge to a photographic process using tools that are located relatively low on the technological tree, are easily replicable, and can be easily disposed of. It's an effort to step against the current of long chains of dependency that support our current society. These dependencies are not inherently bad as they delegate complex tasks and allow for a high degree of specialization. However, it becomes problematic when these dependencies fall under monopolies and distance us from our ability to sustain a civilized life should any link in this chain of dependencies break. While these global chains connect the world and encourage global communication and thinking—a positive outcome—it's concerning when essentials, like our food supply, come from the other side of the planet. There should be an awareness of our physical needs and how to satisfy them locally, fostering a culture that understands how to sustainably meet these needs without relying on extensive global dependencies. | |||
# | |||
== References == | |||
Is Analogue or Digital Photography More Environmentally Friendly?, https://magazine.urth.co/articles/analogue-versus-digital-photography-eco-friendly | Is Analogue or Digital Photography More Environmentally Friendly?, https://magazine.urth.co/articles/analogue-versus-digital-photography-eco-friendly | ||
| Line 45: | Line 95: | ||
Chlorophyll prints – nature expresses itself, https://www.alternativephotography.com/chlorophyll-prints/ | Chlorophyll prints – nature expresses itself, https://www.alternativephotography.com/chlorophyll-prints/ | ||
== Other references == | |||
Aby Warburg -- mood boards | |||
Bruno Larour -- ANT Theory | |||
Vannevar Bush -- Memex system | |||
Latest revision as of 02:56, 23 February 2024
Photography as a medium has captured people's realities since the early 19th century. Over the years, we have employed various imaging procedures without really considering their harmful chemicals. The newest and perhaps the last step we took in this regard was transitioning to sterile digital photography. Unlike film, where light interacts with chemicals, in digital photography, light hits a digital sensor that captures the number of photons hitting each cell in its array of cells. This information can then be digitally processed to resemble the object that was photographed. With the image in the digital realm, it can join the thousands of others on the Cloud. Photography has evolved from capturing important moments like weddings, holidays, and birthdays to being integrated into our cellphones for taking selfies, enabling video calls across the planet, and to maybe spy on us. All of this happens without the need for a chemical process to develop film or print a photo. It seems too good to be true. The use of digital eyes is an integral part of the digital machine that has all of us linked up.
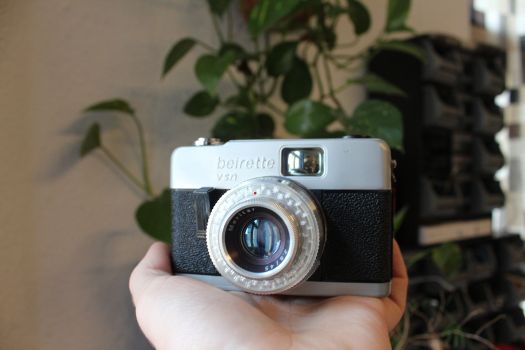
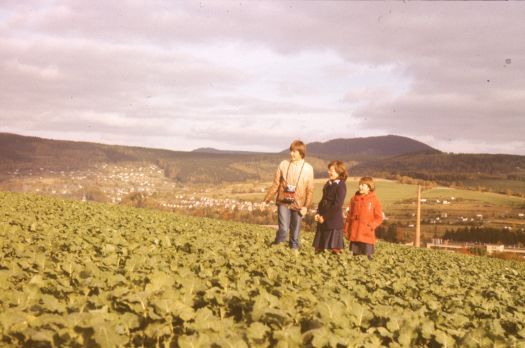
Can you see what the two images have in common? Okay, it's a bit small, but in the right image, my aunt, the tallest one of the three, is wearing the same camera around her neck that I'm holding in the left image. The right image was taken around 1981, and today, around 42 years later, I can still load up a roll of film into that camera and start shooting without any issues.
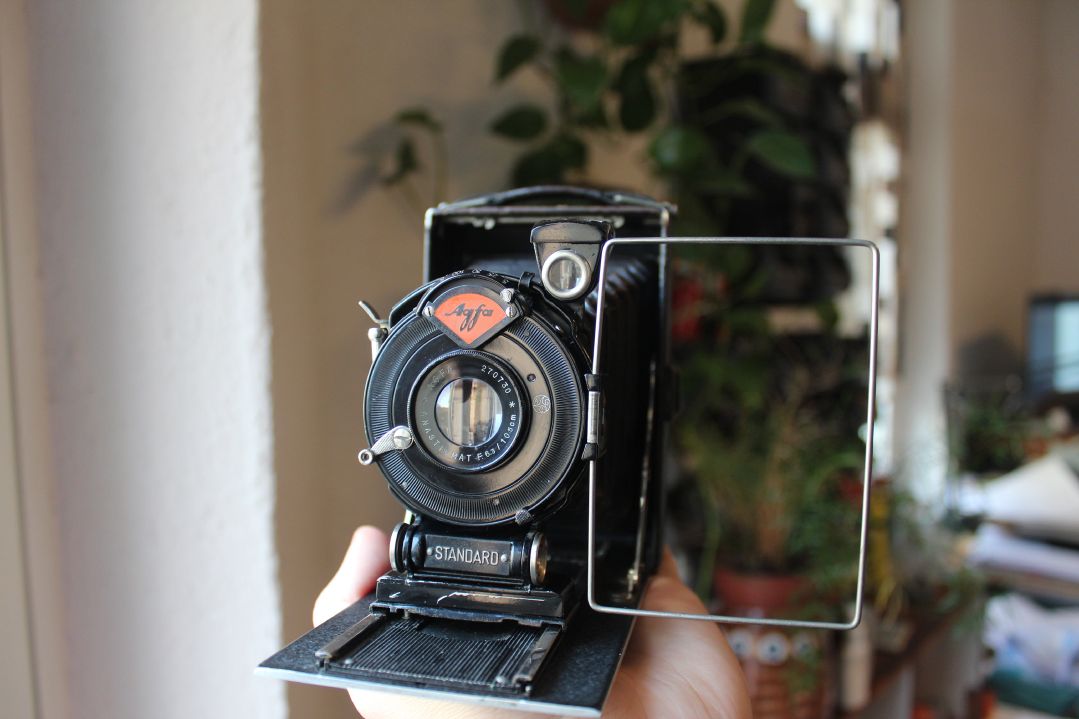
This is another camera I want to introduce to you. It is now nearly 100 years old, produced in 1926, and is in almost working condition. A bit of lubricating oil has dried up, but that's easy to fix.
Will we be able to use our current technology in a hundred years? When was the last time you switched your smartphone? Does the old one still work, and will it ever be used again?
The most likely case is that it will end up in a landfill somewhere. The digital camera that took photos of my childhood is long broken. The data is still there, but will my grandchildren be able to find it in the attic somewhere? I hope so.
The chemical procedures of photo development were and still are pretty harmful (we also developed new, less harmful chemicals). But the tools we used are still functional today. The impact of the production of today's technology is far beyond that. Technological progression has created incentives to make devices that only last a few years. And it is pretty logical. Do you want the new features that are promised by the new generation or not?
The issue is created by the fast progression of technology, which in itself is something good. New knowledge is the key to a better world — how to feed ourselves, how to protect and understand nature, how to survive tomorrow. In the past, every craftsman had their tools, their own tools. A smith's hammer had grooves in the shape of the smith's hand on the handle — signs of wear that enhanced the functionality of the tool. And that made it a solution that only works for that one specific smith. Today's technology isn't like that. It's designed to be scalable and to work for everyone. This has the big advantage that companies get the budget to push technology further than any single person could. But with that, we rush through so many iterations of a technology that only enhances our individual lives by a little bit.
A solution I could see for that is a culture of everyone becoming their own toolmaker. Companys could take step back from the one solution for all to more openly designed systems that are modular, repairable, and customizable. If you invest time in developing your own tools that you understand and that make a big difference in your productivity, you will very likely keep that tool for far longer and adjust it over time to adapt it to new technologies, maybe by just changing one component.
A small step I want to take in this direction is to take this 100-year-old film camera from above and change one component to bring back its functionality and adapt it into the largest modular system called nature. Film cameras use film, and there are different formats of film — small rolls in a casing, bigger rolls, and there also used to be single sheets of film. This camera used these sheets, so if I wanted to use this camera again, I could try to cut up the bigger rolls into fitting pieces, but I could also try something else.
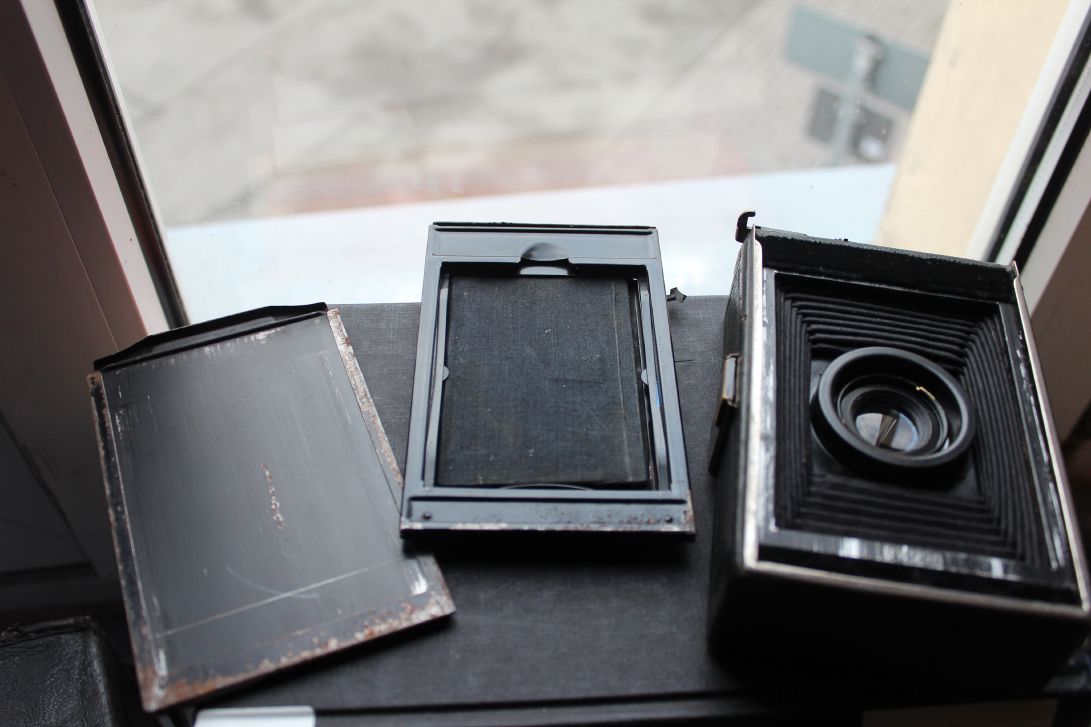
The Camera with two of the backs that can be slid in.
A leaf has adapted to fulfill many roles in the system that is a plant. It creates energy, can store a bit of energy, provides shade from the sun, and can maybe detach and carry a seed. But it is also part of the bigger system of nature. It serves as a building material for insects, composts into nutrients for other plants, or is eaten directly by an animal. All of that and so much more is the role of a leaf.
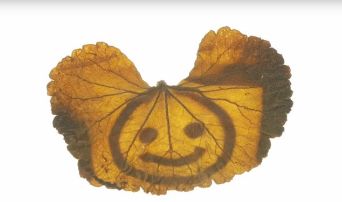
The chloroplasts inside the leaf take CO2, water, and light to produce sugar. If an excess of sugar is produced, it converts a bit into starch for storage. If we now, by external means, control where this excess is produced, we can use an iodine solution to make the starch visible to us and turn the leaf into a picture. This is the principle behind photosynthesis photography.
Let's adapt the camera so that it takes leaves instead of a film sheet and gives the leaf one more role it can be used for.
(Not finished yet)
Making Leaf Prints
I first learned about photosynthesis photography through a video from the YouTube channel Applied Science, which inspired me to try it myself. The guide outlines the process in four steps: exposing the plant, clearing the leaf, developing the leaf, and drying/conserving the leaf.
Exposing
Exposure is central to photography. It involves selecting a subject and composing an image to be captured on photosensitive film, or in this case, a leaf. The aim is to capture anything that appears in front of our camera, but we'll start with contact exposure. Contact exposure entails using an object or subject to block light hitting the film/leaf, creating an image. This can involve letter cutouts, silhouette shapes, or an existing photo negative. To experiment, I took several portraits with a medium format camera, which simply means the negatives are larger, about 6x6 cm in size. Initially, I used paperclips to attach the negatives to the leaves, but later I changed to a setup involving a metal mesh backing and a glass plate in front, sandwiching the photo negative between the glass and the leaf for detailed imprints.
Choosing the right plant is crucial. The video I followed used a geranium, likely due to its well-documented starch formation. Without access to a geranium, I opted for a Cyclamen, noting its similarly thick leaves. I also experimented with other plants, like pothos (Epipremnum aureum). Unlike conventional photography, where exposure times are fractions of seconds, this method requires hours, aligning with the natural rhythm of the sun that plants are adapted to. You can place the prepared leaves in a sunny spot or under grow lights controlled by a timer for over 7 hours of quality light. Alternatively, projecting an image onto a leaf with a light projector for about half an hour can also yield good results.
Clearing
The next step is the clearing of the leaf. A leaf serves many functions in a plant, but for our purposes in photography, we need a structure that suspends the colored starch molecules in something clear to provide good contrast. To prepare the leaf accordingly, we aim to remove any elements that obstruct this clarity, including the chloroplasts that give the leaf its green color and enable starch formation to begin with. After they've fulfilled their role, preventing further starch formation is crucial to maintain the image.
To achieve this, I soaked the leaves in ethanol, the type you can buy for cleaning or camping stoves, for a few days. The video presented several options, including boiling the leaf in methanol, ethanol, and propanol. Boiling in methanol yielded the best results there, but considering its potential health and fire hazards, I sought an alternative.
The soaking method worked well for the Cyclamen, but for the pothos, it created brown spots that rendered it unusable. However, cooking it in ethanol for about 20 minutes was effective. It's important to be cautious during this process to avoid accidentally setting it on fire and to keep the vapors contained, either with a lid or something that allows them to condense.
After this treatment, the ethanol turns green, and the leaf becomes white and very fragile to the touch. To prepare the leaf for the developing/coloring step, I let it soak in water until it regains the flexibility of a leaf again.
Developing
Now, we arrive at the most exciting step: making the starch visible. We use Lugol's iodine solution, invented by a French doctor two hundred years ago and utilized for various purposes. This reddish liquid turns starch a very deep blue/black upon contact. We allow the leaf to soak in a bath of this solution until it's fully saturated and the solution has had enough time to permeate every cell of the leaf. This process usually takes about thirty minutes to an hour, resulting in the leaf adopting the color of the solution.
Next, we need to clear the leaf of the excess Lugol's solution left over after coloring the starch. Another soak in water should do the trick; this is when we can see the images for the first time. If satisfied with the clearing of the leaf, which typically involves multiple water changes over a few hours, I then take the leaves out for drying.
Drying
The drying step is fairly straightforward. Simply place the leaves in tissues under a stack of books and let them sit for a few days. However, it's important to ensure that the tissues don't contain starch, as residual Lugol's solution could react with it and stain the leaves. A quick test with a few drops of the solution on the tissues can confirm their suitability.
During drying, the leaf may shrink significantly, but I suspect that applying more pressure with additional weight on top could mitigate this shrinkage.
And there you have it: small leaf prints and a procedure that might help us to repurpose the camera.
Adapting the Process
To integrate this process with a camera, we need to modify the exposure step—the act of taking the photo. Contact exposure previously offered a lot of freedom, including abundant light and the ability to directly use an already captured image. However, using a plate camera introduces new considerations. This type of camera involves inserting slim casings that hold photographic film or plates into the camera, followed by the removal of a metal plate to expose the photosensitive material. After exposure, the metal plate is reinserted, and the casing is removed, only to be opened in a darkroom to prevent accidental exposure.
Given that a leaf is significantly less sensitive to light, we don't need to be as concerned about light leaks and accidental exposures. For the duration of the photo capture, the leaf must be mounted inside the camera at the focal plane, exposed to light only through the camera's lens. To achieve this, I 3D printed a module that fits into the slot normally used for the film casings. This module holds the leaf flat against the focal plane, with the leaf's stem extending out the back and remaining attached to the plant. To maximize the chances of capturing a good image, we should select a subject with strong contrast and lighting, acknowledging that the leaf will receive significantly less light compared to the contact exposure method.
Conclusion
This is a layman's attempt to create a bridge to a photographic process using tools that are located relatively low on the technological tree, are easily replicable, and can be easily disposed of. It's an effort to step against the current of long chains of dependency that support our current society. These dependencies are not inherently bad as they delegate complex tasks and allow for a high degree of specialization. However, it becomes problematic when these dependencies fall under monopolies and distance us from our ability to sustain a civilized life should any link in this chain of dependencies break. While these global chains connect the world and encourage global communication and thinking—a positive outcome—it's concerning when essentials, like our food supply, come from the other side of the planet. There should be an awareness of our physical needs and how to satisfy them locally, fostering a culture that understands how to sustainably meet these needs without relying on extensive global dependencies.
References
Is Analogue or Digital Photography More Environmentally Friendly?, https://magazine.urth.co/articles/analogue-versus-digital-photography-eco-friendly
Photosynthesis photography: Making images with living plant leaves, https://www.youtube.com/watch?v=-qETedzsFIE
Chlorophyll prints – nature expresses itself, https://www.alternativephotography.com/chlorophyll-prints/
Other references
Aby Warburg -- mood boards
Bruno Larour -- ANT Theory
Vannevar Bush -- Memex system
