No edit summary |
(images) |
||
| (7 intermediate revisions by 2 users not shown) | |||
| Line 1: | Line 1: | ||
Tinder mushrooms, belonging to the genus Fomes, are a type of hard, woody fungi commonly found on decaying trees. A notable species, ''Fomes fomentarius'', has potential applications in various modern industries, including the production of sustainable materials for construction, furniture design, and fashion accessories. Researchers are exploring its use in creating eco-friendly leather alternatives and innovative biocomposites. This mushroom's versatility highlights its significance in the pursuit of sustainable and renewable resources.<gallery> | Tinder mushrooms, belonging to the genus Fomes, are a type of hard, woody fungi commonly found on decaying trees. A notable species, ''Fomes fomentarius'', has potential applications in various modern industries, including the production of sustainable materials for construction, furniture design, and fashion accessories. Researchers are exploring its use in creating eco-friendly leather alternatives and innovative biocomposites. This mushroom's versatility highlights its significance in the pursuit of sustainable and renewable resources.<gallery> | ||
File:Fomes fomentarius 2010 G2.jpg | File:Fomes fomentarius 2010 G2.jpg | ||
| Line 290: | Line 292: | ||
<u>Step 2:</u> | <u>Step 2:</u> | ||
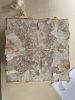
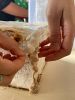
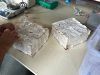
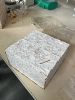
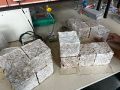
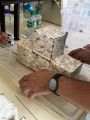
* Inspect the mold every few days. Once the material is securely bonded and there are no signs of contamination, it is ready to be extracted from the negative mold. | * Inspect the mold every few days. Once the material is securely bonded and there are no signs of contamination, it is ready to be extracted from the negative mold.<gallery widths="100" heights="100"> | ||
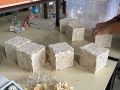
* Gently remove the object from the mold. Start stacking to Tetris shaped objects. Place it into a loosely closed plastic container to ensure air circulation. | File:Square opened 5.jpg | ||
* Return the object to an environment suitable for mushroom growth and observe its development every few days. | File:Square UNopened 1.jpg | ||
* Rotate the object to a different position if the mycelium growth is uneven or not progressing as expected. | File:Fungie flower.jpg | ||
File:Square opened 2.jpg | |||
File:Square opened 1.jpg | |||
</gallery> | |||
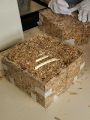
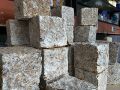
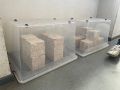
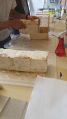
* Gently remove the object from the mold. Start stacking to Tetris shaped objects. Place it into a loosely closed plastic container to ensure air circulation.<gallery> | |||
File:Blocks 5.jpg | |||
File:Blocks.jpg | |||
File:Block 2.jpg | |||
File:Alined blocks 1.jpg | |||
File:Alined blocks 3.jpg | |||
</gallery> | |||
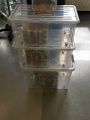
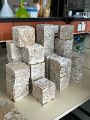
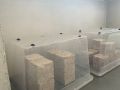
* Return the object to an environment suitable for mushroom growth and observe its development every few days.W<gallery> | |||
File:Boxes stored 1.jpg | |||
File:Boxes stored 2.jpg | |||
</gallery> | |||
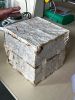
* Rotate the object to a different position if the mycelium growth is uneven or not progressing as expected.<gallery> | |||
File:Rotating 1.jpg | |||
File:Rotating 2.jpg | |||
File:Rotating 3.jpg | |||
</gallery> | |||
<u>Step 3:</u> | <u>Step 3:</u> | ||
| Line 305: | Line 326: | ||
For reference to the original experiment, please see [https://www.top-ev.de/wp-content/uploads/2021/09/Fabrication-of-a-solid-object-made-of-mycelium.pdf Fabrication of a solid object made of mycelium composite materials] | For reference to the original experiment, please see [https://www.top-ev.de/wp-content/uploads/2021/09/Fabrication-of-a-solid-object-made-of-mycelium.pdf Fabrication of a solid object made of mycelium composite materials] | ||
//Doku by Mojjo Krenz | |||
== Myco-hat == | |||
[[File:Plans.jpg|thumb|Plans and equipment used to create the mould for the mushroom hat|247x247px]] | |||
Project by Lucy Hale | |||
My planned outcome for this project was quite a whimsical one, to create a mushroom-shaped hat out of tinder mushroom mycelium after seeing ‘fairy cosplayers’ online wearing mushroom shaped hats made of polystyrene, silicone or thick fabric. I believed that emulating this idea using actual mushroom mycelium would make for a more environmentally friendly, unique and realistic approach to creating a fun mushroom hat design.. | |||
I began by planning the overall shape and method of creating the necessary mould for the structure. I decided to use some rather unconventional objects to create the mould such as a beach ball, bowl and papier-mâché in order to have a more rough, organic quality in the final outcome. | |||
Step 1. Creating the mould[[File:Small bowl .jpg|left|thumb|150x150px|Small bowl covered with papier-mâché ]]The mould for the mushroom hat was made by creating a large semi-circular negative using a beach ball and a smaller head-space made by a small plastic mixing bowl bent to the shape of the average head. | |||
These components were then covered in three layers of papier-mâché using newspaper, tissue paper, water and PVA glue. | |||
These were then left to dry for 48 hours in which time the Mycelium bags (outlined in step 3 of the Myco-Tetris project) had fully cultivated. | |||
Once the moulds had dried, plastic wrap and duct tape was applied to the contact surfaces to ensure the mould was water proof and would have no direct contact with the Mycelium which would consume the paper elements. [[File:Moulds.jpg|left|thumb|150x150px|Large ‘beach ball’ mould covered in papier-mâché ]] | |||
Step 2. Infilling the mould | |||
Using two mycelium bags in total, I began by breaking up the substrate by hand in a large box with latex gloves worn. | |||
Beginning with the large piece of the mould, I filled in an approximately 8- 10cm thick layer from the bottom of the mould with the mycelium substrate before inserting the small head-space negative mould on top of this. [[File:Infilling.jpg|left|thumb|150x150px|Filling in the mould]][[File:Infilling2.jpg|left|thumb|150x150px|Densely packing the mould]] | |||
[[File:Wrapped.jpg|left|thumb|150x150px|Mould sealed in plastic wrap]] | |||
[[File:Growth.jpg|left|thumb|150x150px|Partially grown mycelium in mould]]Ensuring density was maintained by pushing the mycelium as deep as possible throughout, I then began to fill in the sides between the inner head-space negative and the large overall mould until the mycelium reached the top | |||
At this point, plastic wrap was applied to the open top to seal in the mycelium, with a small hole pierced to allow a small amount of airflow. This was kept taut and secure by more duct tape. | |||
Step 3. Growth Stage | |||
The filled mould is then placed in a large airtight box and left to propagate for a week to fill the shape effectively. | |||
After this week, the mycelium shape is removed from the mould and patted dry with a paper towel. The box is also cleaned and disinfected with alcohol and also dried with paper towels. | |||
The now-free mycelium shape is then placed back into the box in a location away from direct sunlight* to develop further for a week in order to grow a strong surface layer of mycelium. | |||
After this week, it is then flipped and replaced in order to get equal growth all over and left to propagate for another week. | |||
At this point the mycelium is fully grown and ready to be dried. | |||
''*during this process, the mycelium unfortunately experienced some sunlight due to its placement which I believe contributed to its distress and subsequent browning. When doing this again, keeping the box in a dark but slightly warm environment would be most preferable to retain the white exterior.'' | |||
Step 4: Drying the mycelium | |||
I experimented with various temperatures and durations while drying the myco-hat. I ultimately found that ‘baking’ it in the oven at 80-90 degrees for an hour is most effective. This is followed by a three hour cooling period before repeating the process again. | |||
I did this 5 times over two days and am now left with a completely dehydrated, lightweight hat that has experienced no burning or shrinking. | |||
The result. | |||
Ultimately I am very happy and proud of what I have created and I am seriously considering setting uop a small mycelium lab in my home to continue experimenting and also pitching the idea of mycelium workshops back in my home university. The mycelium hat has gone down a storm among my friends, family and professors and people are always shocked to hear that it is made of real mushroom mycelium. It’s already sat upon many people’s heads and I’ve had requests to make more and sell them! | |||
[[File:Partiallygrown.jpg|thumb|150x150px|Partially grown mycelium removed from mould[[File:Growth2.jpg|thumb|150x150px|One week of growth in box ]]]] | |||
[[File:Grown.jpg|thumb|150x150px|[[File:Friend5.jpg|thumb|150x150px|Myco-hat with acrylic paint spots ]][[File:Me in hat.jpg|thumb|150x150px|Me wearing the finished hat]][[File:Friend6.jpg|left|thumb|150x150px]][[File:Friend7.jpg|left|thumb|150x150px]]]] | |||
[[File:Friend.jpg|thumb|150x150px|[[File:Friend4.jpg|left|thumb|150x150px]]]] | |||
[[File:Friend2.jpg|thumb|150x150px]] | |||
In the past few days, I made the decision to paint on some white spots with acrylic paint to emulate a toadstool and I believe this adds to its charm even more! My next plan for the project is to maybe create a cylindrical stand to hold the hat made out of wood which would make the overall structure resemble a whole mushroom, but this is something I will work on once I return to my home country. | |||
Latest revision as of 19:55, 15 July 2024
Tinder mushrooms, belonging to the genus Fomes, are a type of hard, woody fungi commonly found on decaying trees. A notable species, Fomes fomentarius, has potential applications in various modern industries, including the production of sustainable materials for construction, furniture design, and fashion accessories. Researchers are exploring its use in creating eco-friendly leather alternatives and innovative biocomposites. This mushroom's versatility highlights its significance in the pursuit of sustainable and renewable resources.


Images: Wikipedia https://www.zvnder.com/ https://marikoppanen.com/
Myco-Tetris
Myco-Tetris, a project by Alessandro Volpato, is an interactive initiative involving the public in manufacturing fungal composites, aiming to stimulate biotechnology research and encourage sustainable design. By engaging in activities like playing, building, and learning about fungi, visitors contribute to co-design efforts and applied research in fungal biotechnology.
As the course "Growing Microorganisms for Bioart Projects SoSe24," we are continuing with the Myco-Tetris project, and this document serves as our day-by-day documentation. The actual work spans four meetings, capturing our progress and insights throughout the process.
Day 0 Prepare Agar Medium Petri Dishes
The preparation of agar medium Petri dishes was already completed in advance, allowing the course participants to skip this step. For reference to the original experiment, please see Prepare Agar Medium Petri Dishes
Day 1 Prepare agar medium flat jars
Objective: Prepare a versatile nutritional medium for mushroom cultivation.
Materials: Flat jar, wadding, agar-agar, malt extract powder, marker, distilled water, pressure cooker, precision scale (0,1 g), aluminum foil.
Step 1: Calculate Ingredient Ratios
| Component | Quantity | Custom Quantity | |
|---|---|---|---|
| Malt Extract (Nutrient source) | 2g | x | |
| Agar-agar (Footing for the growth - 3D support) | 2g | x | |
| Distilled water | 100ml | x |
Step 2: Weigh Ingredients And Mix Into Flask
- Use a scale to measure the required ingredients accurately.
- Construct a container using clean aluminum foil or paper.
- Combine the ingredients in a flask or jar, ensuring thorough mixing.
- Create a hole in the lid and insert cotton wadding to enable pressure cooking and facilitate air exchange for the mushrooms.
- Pour enough of the mixture into each container to cover the bottom adequately. (A thicker agar layer consumes more materials but prevents drying during long-term fridge storage.)
- Seal the jars and cover the lids with aluminum foil to prevent microbes from reaching the air filter later on.
Step 3: Sterilize In Pressure Cooker
- Add a few centimeters of water into the pressure cooker, ensuring the vessels are submerged but not floating. Close the cooker and reach the designated temperature and pressure point (121°C, 15 PSI). (Avoid using airtight containers in the pressure cooker to prevent bursting; always refer to the pressure cooker manual for proper usage.)
- Reduce the heat to maintain a gentle boil and keep it at the minimum temperature to ensure the water continues to boil.
- Wait for 40 minutes from the point when pressure and heat are reached.
- Turn off the heating source and allow the cooker to cool down naturally. HINT: Avoid releasing pressure suddenly as it may cause the medium to overboil.
- Once the cooker is slightly warm, release the remaining pressure (there should be none), open the lid, and carefully remove the medium.
- Let the jars cool down naturally before storing them in the fridge.
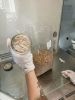
Step 4: Add Mycelium & Incubate


For reference to the original experiment, please see Prepare agar medium flat jars
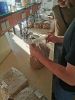
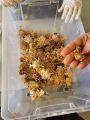
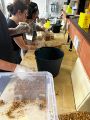
Day 2 Preparation of Grain Spawn
Objective: Prepare grain substrate in a jar to produce biomass.
Materials: pressure cooker, scale, distilled water, rice grains, gypsum (CaSO4 - calcium sulphate), spoon, plate with well-growing mycelium, scalpel, gloves, ethanol, jar, wadding
Step 1: Weigh Materials
| Component | Quantity | Component Quantity Custom Quantity | |
|---|---|---|---|
| rice grain | 30 | multiplier | g |
| Calcium sulphate (gypsum) | (2%) 0.6g | multiplier | g |
Step 2: Soak rice Grains and Add Gypsum
- Pour boiling distilled water over rice grains and allow them to soak for a minimum of one hour to absorb the water fully.
- Drain any excess liquid.
- Combine the gypsum with the soaked rice grains, ensuring thorough mixing
- Transfer the mixture into a heat-resistant glass jar.
- Create a ventilation hole in the lid and insert cotton wadding for mushroom air exchange.
- Seal the jars and cover the lid with aluminum foil.


Step 3: Sterilize In Pressure Cooker
- Sterilize in the pressure cooker for 1 hour (Avoid airtight containers, as they may burst!)
- Remove the lid from the cooker and let the jars cool down (Adding mycelium now could cause it to cook).
- While cooling, sterilize surfaces, materials, tools, and hands with disinfectants or alcohol.


Step 4: Add Mycelium
- Cut a large piece of agar-mycelium from the PD and place it onto the surface of the grain (Select a piece from the outer part of the mycelium where young and fast-spreading hyphae are present). (Do not worry about transferring some agar as well; no harm will occur.)
- Seal the jar with its lid.


Step 5: Incubate
- Incubate the jar at room temperature in dark conditions.
- After 3-6 days, consider gently mixing the grains to facilitate faster growth, either by using sterilized spoons to stir within the jar or by gently shaking to break up clumps.
- Depending on the jar's size and the speed of growth, expect full colonization to occur within 1 to 3 weeks.
For reference to the original experiment, please see Preparation of Grain Spawn
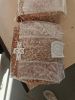
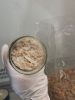
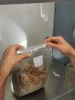
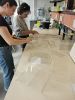
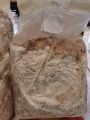
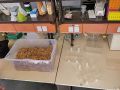
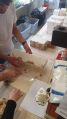
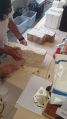
Day 3 Preparation of a Small Bag with Substrate
Objective: Prepare a sterile small bag to expand mycelium for fructification, fabrication, or as an inoculant for larger vessels.
Materials for 1 bag: See below, bucket that can hold 5 L (for mixing), jar with clean grain spawn, substrate, alcohol(?), autoclavable plastic bags, gloves, distilled water (approx. 2,5x the dry weight of the substrate).#
Step 1: Weigh the Substrate
- Combine the solid components in a bowl and weigh them.
- Add distilled water to the mixture.
- Mix thoroughly, ensuring to break down any chunks and evenly distribute the moisture throughout the substrate.
- Transfer the substrate into a filter bag or an autoclavable container equipped with an air filter.
| Main Data | |
|---|---|
| Total dry weight | 4500 |
| Grain spawn | 15% |
| Gypsum | 1% |
| Ingredient | Weight | Composition | % |
|---|---|---|---|
| Hemp | 2646 | 70% | 59% |
| Bran | 1134 | 30% | 25% |
| Straw | |||
| Spawn | 675 | 15% | |
| Gypsum | 37.8 | 1% | |
| Total | 4492.8 | 100% | 100% |
| Water | 5670ml |


Step 2: Sterilise
- Sterilize the bag by pressure cooking it for 50 minutes.
- After sterilization, allow the bag to cool down. Note that the substrate can retain heat for several hours, so always squeeze it gently to assess the temperature at the center.

Step 3: Mix In Mycelium
- If using grain spawn, break it down by shaking the jar or by using a sterile or flamed spoon to mix the grains.
- If the liquid culture is not already fragmented, mix the contents well with a sterile or flamed spoon.
- Pour or spread the inoculant into the bag and seal it.
- Roll the bag to thoroughly mix the contents.


Step 4: Incubate
- Incubate in darkness for 1 to 6 weeks.
- Check the progress of the mycelium every two to three days, and monitor for any signs of contamination.
For reference to the original experiment, please see Preparation of a Small Bag with Substrate
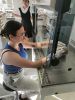
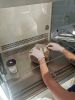
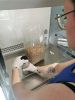
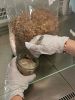
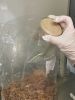
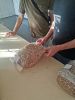
Day 4 Fabrication of a solid object made of mycelium composite materials
Materials: Negative mold (PLEXIGLAS), well colonised substrate, kitchen wrap, gloves, rubbing alcohol, spray bottle.
Step 1:
- Construct a negative mold and cover the surfaces with kitchen wrap.
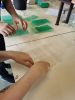


- Wear gloves and clean everything with 70% alcohol, including the working surface, tools, and mold.
- Break down the mycelium in the bag/culture into tiny pieces with your hands; the smaller, the better.

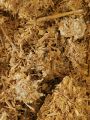


- Fill the mold with the substrate and press the material firmly.

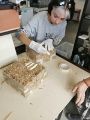


- Wrap the filled mold in kitchen film and puncture it to allow oxygen flow.

- Place the mold in an environment conducive to mushroom growth, ensuring optimal temperature, humidity, and light conditions.

Step 2:
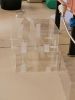
- Inspect the mold every few days. Once the material is securely bonded and there are no signs of contamination, it is ready to be extracted from the negative mold.


- Gently remove the object from the mold. Start stacking to Tetris shaped objects. Place it into a loosely closed plastic container to ensure air circulation.


- Return the object to an environment suitable for mushroom growth and observe its development every few days.W


- Rotate the object to a different position if the mycelium growth is uneven or not progressing as expected.


Step 3:
- Once the object is deemed ready, it needs to be thoroughly dried. The drying process typically takes 1 to 3 days, so plan accordingly.
- Preheat your home oven to 60-70°C (140-160°F).
- Place the object inside the oven and let it heat for 1 hour.
- Check if the object is dry by touching it. If it is dry, allow it to rest overnight. If it is still moist, leave it in the oven.
- If the object remains moist, repeat the drying steps as needed.
- If mold appears on the object, thoroughly wipe the surface with alcohol, let it dry, and continue the drying cycles.
For reference to the original experiment, please see Fabrication of a solid object made of mycelium composite materials
//Doku by Mojjo Krenz
Myco-hat

Project by Lucy Hale
My planned outcome for this project was quite a whimsical one, to create a mushroom-shaped hat out of tinder mushroom mycelium after seeing ‘fairy cosplayers’ online wearing mushroom shaped hats made of polystyrene, silicone or thick fabric. I believed that emulating this idea using actual mushroom mycelium would make for a more environmentally friendly, unique and realistic approach to creating a fun mushroom hat design..
I began by planning the overall shape and method of creating the necessary mould for the structure. I decided to use some rather unconventional objects to create the mould such as a beach ball, bowl and papier-mâché in order to have a more rough, organic quality in the final outcome.
Step 1. Creating the mould

The mould for the mushroom hat was made by creating a large semi-circular negative using a beach ball and a smaller head-space made by a small plastic mixing bowl bent to the shape of the average head.
These components were then covered in three layers of papier-mâché using newspaper, tissue paper, water and PVA glue.
These were then left to dry for 48 hours in which time the Mycelium bags (outlined in step 3 of the Myco-Tetris project) had fully cultivated.
Once the moulds had dried, plastic wrap and duct tape was applied to the contact surfaces to ensure the mould was water proof and would have no direct contact with the Mycelium which would consume the paper elements.

Step 2. Infilling the mould
Using two mycelium bags in total, I began by breaking up the substrate by hand in a large box with latex gloves worn.
Beginning with the large piece of the mould, I filled in an approximately 8- 10cm thick layer from the bottom of the mould with the mycelium substrate before inserting the small head-space negative mould on top of this.


Ensuring density was maintained by pushing the mycelium as deep as possible throughout, I then began to fill in the sides between the inner head-space negative and the large overall mould until the mycelium reached the top
At this point, plastic wrap was applied to the open top to seal in the mycelium, with a small hole pierced to allow a small amount of airflow. This was kept taut and secure by more duct tape.
Step 3. Growth Stage
The filled mould is then placed in a large airtight box and left to propagate for a week to fill the shape effectively.
After this week, the mycelium shape is removed from the mould and patted dry with a paper towel. The box is also cleaned and disinfected with alcohol and also dried with paper towels.
The now-free mycelium shape is then placed back into the box in a location away from direct sunlight* to develop further for a week in order to grow a strong surface layer of mycelium.
After this week, it is then flipped and replaced in order to get equal growth all over and left to propagate for another week.
At this point the mycelium is fully grown and ready to be dried.
*during this process, the mycelium unfortunately experienced some sunlight due to its placement which I believe contributed to its distress and subsequent browning. When doing this again, keeping the box in a dark but slightly warm environment would be most preferable to retain the white exterior.
Step 4: Drying the mycelium
I experimented with various temperatures and durations while drying the myco-hat. I ultimately found that ‘baking’ it in the oven at 80-90 degrees for an hour is most effective. This is followed by a three hour cooling period before repeating the process again.
I did this 5 times over two days and am now left with a completely dehydrated, lightweight hat that has experienced no burning or shrinking.
The result.
Ultimately I am very happy and proud of what I have created and I am seriously considering setting uop a small mycelium lab in my home to continue experimenting and also pitching the idea of mycelium workshops back in my home university. The mycelium hat has gone down a storm among my friends, family and professors and people are always shocked to hear that it is made of real mushroom mycelium. It’s already sat upon many people’s heads and I’ve had requests to make more and sell them!


In the past few days, I made the decision to paint on some white spots with acrylic paint to emulate a toadstool and I believe this adds to its charm even more! My next plan for the project is to maybe create a cylindrical stand to hold the hat made out of wood which would make the overall structure resemble a whole mushroom, but this is something I will work on once I return to my home country.