GMU:Tutorials/Networking/Controlling Unity with Processing: Difference between revisions
m (→Example: Make an object jump on clapping: formatting) |
m (→Processing: formatting) |
||
| Line 20: | Line 20: | ||
== Processing == | == Processing == | ||
In Processing you need to install a library. Click on ''Tools'' – ''Add Tools'' – Choose ''Libraries'' – Search for oscP5 and install it.<br><br> | In Processing you need to install a library. Click on ''Tools'' – ''Add Tools'' – Choose ''Libraries'' – Search for oscP5 and install it.<br><br> | ||
This is the basic processing script for sending Osc data (it just sets up the connection, actions can be added): <br>< | This is the basic processing script for sending Osc data (it just sets up the connection, actions can be added): <br> | ||
//load libraries | <source lang="javascript"> | ||
import netP5.*; | //load libraries | ||
import oscP5.*; | import netP5.*; | ||
OscP5 oscP5; | import oscP5.*; | ||
NetAddress myRemoteLovation; | |||
//make a connection | OscP5 oscP5; | ||
void setup () { | NetAddress myRemoteLovation; | ||
osP5 = new OscP5 (this, 9000); | |||
myRemoteLocation = new NetAddress("127.0.0.1", 9000); | //make a connection | ||
} | void setup () { | ||
// this is where you can make things happen and send values to Unity | osP5 = new OscP5 (this, 9000); | ||
void draw () { | myRemoteLocation = new NetAddress("127.0.0.1", 9000); | ||
OscMessage myMessage = new OscMessage ("/"); | } | ||
// add a value to the message (optional) | |||
myMessage.add(somevalue); | // this is where you can make things happen and send values to Unity | ||
// add a bool to the message (optional) | void draw () { | ||
myMessage.add(true); | OscMessage myMessage = new OscMessage ("/"); | ||
oscP5.send(myMessage, myRemoteLocation); | // add a value to the message (optional) | ||
} | myMessage.add(somevalue); | ||
// this is where you get feedback in Processing | // add a bool to the message (optional) | ||
void oscEvent (OscMessage theOscMessage) { | myMessage.add(true); | ||
print("### received an osc message."); | oscP5.send(myMessage, myRemoteLocation); | ||
print(" addrpattern: "+theOscMessage.addrPattern()); | } | ||
println(" typetag: "+theOscMessage.typetag()); | |||
println("### received an osc message. with address pattern"+theOscMessage.addrPattern()+" typetag | // this is where you get feedback in Processing | ||
}</ | void oscEvent (OscMessage theOscMessage) { | ||
print("### received an osc message."); | |||
print(" addrpattern: "+theOscMessage.addrPattern()); | |||
println(" typetag: "+theOscMessage.typetag()); | |||
println("### received an osc message. with address | |||
pattern"+theOscMessage.addrPattern()+" typetag | |||
+theOscMessage.typetag()); | |||
} | |||
</source> | |||
== Unity == | == Unity == | ||
With just a little help from Google (or bing if you’re one of those people) you can find one of these Osc Receiver Scripts. You will also need scripts for [https://github.com/heaversm/unity-osc-receiver/tree/master/Assets/Plugins Osc and Udp]. | With just a little help from Google (or bing if you’re one of those people) you can find one of these Osc Receiver Scripts. You will also need scripts for [https://github.com/heaversm/unity-osc-receiver/tree/master/Assets/Plugins Osc and Udp]. | ||
Revision as of 10:54, 27 July 2016
On 1 Computer

1. Open Unity and Processing.
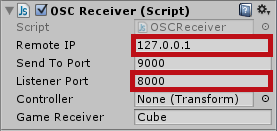
2. In both programs the Remote IP should be set to 127.0.0.1
3. The SendToPort in Processing equals the ListenerPort in Unity. You will have to adjust the values manually. Usually port values between 7000 and 15000 are not taken, so you can use them for your OSC connection. If it is not working try changing the ports. Do not use the same value twice at the same time, if you have more than one connection running.
On 2 Computers

1. Make sure you are connected to the same Wifi. If it does not work there might be an active firewall disturbing your work, so turn that off if you have to.
2. Open Unity and Processing.
3. In Unity fill in the IP of the Computer that is running Processing.
4. The SendToPort in Processing equals the ListenerPort in Unity. You will have to adjust the values manually. Usually port values between 7000 and 15000 are not taken, so you can use them for your OSC connection. If it is not working try changing the ports. Do not use the same value twice at the same time, if you have more than one connection running.
Processing
In Processing you need to install a library. Click on Tools – Add Tools – Choose Libraries – Search for oscP5 and install it.
This is the basic processing script for sending Osc data (it just sets up the connection, actions can be added):
//load libraries
import netP5.*;
import oscP5.*;

OscP5 oscP5;
NetAddress myRemoteLovation;

//make a connection
void setup () {
  osP5 = new OscP5 (this, 9000);
  myRemoteLocation = new NetAddress("127.0.0.1", 9000);
}

// this is where you can make things happen and send values to Unity
void draw () {
  OscMessage myMessage = new OscMessage ("/");
    // add a value to the message (optional)
    myMessage.add(somevalue);
    // add a bool to the message (optional)
    myMessage.add(true);
  oscP5.send(myMessage, myRemoteLocation);
}

// this is where you get feedback in Processing
void oscEvent (OscMessage theOscMessage) {
  print("### received an osc message.");
  print(" addrpattern: "+theOscMessage.addrPattern());
    println(" typetag: "+theOscMessage.typetag());
    println("### received an osc message. with address
    pattern"+theOscMessage.addrPattern()+" typetag
    +theOscMessage.typetag());
}
Unity
With just a little help from Google (or bing if you’re one of those people) you can find one of these Osc Receiver Scripts. You will also need scripts for Osc and Udp.
1. Import the scripts to the Assets folder using drag&drop.
If you’re working on a real actual project it might be best to create a folder for all your scripts.
2. Create an empty game object (right click in the hierarchy) and rename it, so you know what it is.
3. From the assets you drag the scripts onto the empty game object.
4. Do not forget to adjust the IP, and the port in the inspector.

5. In the Inspector you see the public variable Game Receiver within the Osc Receiver Script. Drag the object you want to manipulate from the hierarchy onto the Game Receiver value. By default this value is called “Cube”.

6. If you haven't done it already - Safe! Ctrl+S on Windows, Macs probably do that differently, but you will know that better than me.
If all this code is completely new to you and you only understand trainstation – here is an explanation for the whole OSC Receiver Script:
Public values are adjustable without any coding; just use the inspector for that.
public var RemoteIP : String = "";

public var SendToPort : int = xxxx;

public var ListenerPort : int = yyyy;

public var controller : Transform;

public var gameReceiver = "Cube";
In the Start() function all the necessary scripts and components are connected. This will happen once you press Play.
public function Start ()

{

var udp : UDPPacketIO = GetComponent("UDPPacketIO");

udp.init(RemoteIP, SendToPort, ListenerPort);

handler = GetComponent("Osc");

handler.init(udp);

handler.SetAllMessageHandler(AllMessageHandler);

}
The AllMessageHandler() function is where the Osc happens. This function unpacks the Osc signals, so you can address them in other functions. In this function you can command, whenever A happens, you want FunctionB() to be executed.
public function AllMessageHandler(oscMessage: OscMessage){

var msgString = Osc.OscMessageToString(oscMessage);

var msgAddress = oscMessage.Address;

var msgValue = oscMessage.Values[0];
So you typed all that code and there are no errors but that stupid thing still won't do what it should - try Debug.Logs! Just add them everywhere! They can tell you what parts of your script are accessed after you press Play.
Debug.Log("Stakkars meg, som har skrevet 50 Debug.Logs");
The lines will be written in the console section of Unity once they are accessed.

Example: Make an object jump on clapping
1. In Processing:
a) Install an additional library for sound. Click on Tools – Add Tools – Choose Libraries – Search for Minim and install it.
b) To your imported Libraries add
import ddf.minim.*;c) Add Audio variables to your script. This script will also draw a circle depending on the audio volume.
float x;<br>
float y;<br>
Minim minim;<br>
AudioInput input;
d) In the Setup() function add the values for the circle and create the audiotoolkit
size (320, 240);<br>
smooth();<br>
stroke (255, 25);<br>
noFill ();<br>
// Set start position<br>
x = 0;<br>
y = 20;<br>
minim = new Minim (this);<br>
input = minim.getLineIn (Minim.STEREO, 512);<br>
background (0);
e) The draw() function will be the container of the circle’s size. It will only send the values to Unity if the circle is big enough.
void draw () {<br>
int i =0;<br>
float dim = input.mix.level () * width;<br>
if (dim >= 80){System.out.println("Loud enough: "+dim);<br>
OscMessage myMessage = new OscMessage("/");<br>
myMessage.add(dim);<br>
myMessage.add(true);<br>
oscP5.send(myMessage, myRemoteLocation);}
f) When you are ready, press Play.
2. In Unity:
a) Create an object in Unity. Drag this object onto the gameReceiver of your Osc Receiver Script. This object is now the gameReceiver and will behave as you define in the Osc Receiver script.
b) Open up the Osc Receiver Script. Define a new private variable.
private var moveSpeed : int = 0;
c) Create a new public function.
public function MoveObject(msgValue) : void
{
moveSpeed = msgValue;
}
d) In the Update() function add
var go = GameObject.Find(gameReceiver);<br>
go.transform.Translate(0, moveSpeed, 0);
e) In the AllMessageHandler() function add
switch (msgAddress){
 default:
  MoveObject(msgValue);
  break;}
f) When you are ready, press Play.
Example: Use your mouse position to Control Objects
S O O O O O O O O O N