m (moved Project Sketch to GMU:DIY-Microscopy/Adriana) |
m (→Images II) |
||
| (58 intermediate revisions by 2 users not shown) | |||
| Line 1: | Line 1: | ||
[[Image: | How to transform a USB Webcam into a microscope? | ||
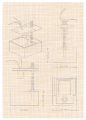
== Microscopy stage == | |||
One of the first steps is to work on the design of the stage to fix the microscope. | |||
It is important to make the drawing in the right scale. For my design, I took up the idea from the origins of the microscope where the eyepiece, the lenses and the arm are on top and the light, the aperture and the object are on the lower part. | |||
In this case, the lens is placed on a platform that can be moved up and down trough a threaded rod. This rod is fixed with nuts to the stage. The base consists in a kind of box with a hole to put the slide, which contains the object. | |||
<gallery> | |||
File:DIY Adriana.jpg|Microscope | |||
</gallery> | |||
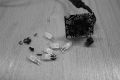
== Taking pieces apart == | |||
The disassembly of the camera is not an easy task. All the pieces have to be removed, including the LEDs (unsolder), until only the PCB is left. | |||
<gallery> | |||
File:step1 microscope Adriana.jpg|Without lens | |||
File:step2 microscope Adriana.jpg|Removing the cover | |||
File:step3 microscope Adriana.jpg|Unsoldering LEDs | |||
File:step4 microscope Adriana.jpg|Disassembled camera | |||
</gallery> | |||
== Turning the lens == | |||
The lens has to be inverted and fixed to the PCB. | |||
<gallery> | |||
File:microscope lens Adriana 1.jpg|Fixing with a hot glue gun | |||
File:microscope lens Adriana 2.jpg|Removed pieces | |||
File:microscope lens Adriana 3.jpg|PCB | |||
</gallery> | |||
== 3D Model == | |||
During the whole design process some small changes were made. An example of this is the platform slot, which allows the movement in every direction, also the size of the aperture and later the small pieces to hold the slide. | |||
The 3D Model shows different views of the prototype. | |||
<gallery> | |||
File:3D Adriana.jpg|3D view | |||
File:3d_sketchup_Adriana.jpg|Four views | |||
</gallery> | |||
Download [[Media:Micro.zip]] | |||
== Cardboard Model == | |||
The best way to know if the prototype works is to build an actual size model. | |||
I used model making cardboard because is cheap and excellent material. You will also need some kind of adhesive, a cutter, screws, nuts (butterfly, hex, cap), a threated rod, washers and a small piece of acrylic. | |||
<gallery> | |||
File:Model cardboard Adriana.jpg|Cardboard model | |||
File:Model cardboard Adriana 2.jpg|Cardboard model | |||
</gallery> | |||
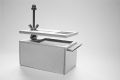
== Laser cut == | |||
I decided to use Acrylglas for the final design. Because of the material and the size of the pieces, it was necessary to use a laser-cutting machine. | |||
[[File:laser cutting Adriana.jpg|250px]] | |||
Download: [[Media:laser cutting Adriana 2.pdf]] | |||
<gallery> | |||
File:armado final 1.jpg|Laser cut parts | |||
File:armado final 3.jpg|Materials & tools | |||
File:armado final 4.jpg|Materials & tools | |||
File:armado final 5.jpg|Assembling | |||
</gallery> | |||
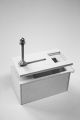
== Acrylglas Model == | |||
<gallery> | |||
File:Microscopio acrilico 1.jpg|Final stage | |||
File:Microscopio acrilico 2.jpg|Final stage | |||
File:Microscopio acrilico final.jpg|Camera & stage | |||
</gallery> | |||
== Images == | |||
<gallery caption="Fly"> | |||
File:fly leg detail 1.jpg| | |||
File:fly leg detail 2.jpg| | |||
File:fly leg detail 3.jpg| | |||
File:fly leg detail 4.jpg| | |||
File:fly wing 1.jpg| | |||
File:fly wing 2.jpg| | |||
</gallery> | |||
<gallery caption="Scuff"> | |||
File:scuff detail 1.jpg| | |||
File:scuff detail 2.jpg| | |||
File:scuff detail 3.jpg| | |||
File:scuff detail 4.jpg| | |||
</gallery> | |||
<gallery caption="Mildew"> | |||
File:moldy cheese 1.jpg| | |||
File:moldy cheese 2.jpg| | |||
File:moldy cheese 3.jpg| | |||
File:moldy cheese 4.jpg| | |||
</gallery> | |||
<gallery caption="Weed"> | |||
File:weed detail 1.jpg| | |||
File:weed detail 2.jpg| | |||
File:weed detail 3.jpg| | |||
File:weed detail 4.jpg| | |||
</gallery> | |||
<gallery caption="Ginger"> | |||
File:ginger pulp 1.jpg| | |||
File:ginger pulp 2.jpg| | |||
File:ginger pulp 3.jpg| | |||
File:ginger pulp 4.jpg| | |||
</gallery> | |||
== Video == | |||
<videoflash type=vimeo>54254808|640|480</videoflash> | |||
== Example == | |||
* [http://www.wehi.edu.au/education/wehitv 3D Animation] | |||
* [http://sillyreverie.com/2011/11/09/homemade-laser-microscope How to create a homemade laser microscope] | |||
* [http://www.youtube.com/watch?v=lLSKnRaJWK0 Homemade laser projection microscope] | |||
== Images II == | |||
<gallery caption="Spider web"> | |||
File:spidernet1 Adriana.jpg| | |||
File:spidernet2 Adriana.jpg| | |||
File:spidernet3 Adriana.jpg| | |||
File:spidernet4 Adriana.jpg| | |||
File:spidernet5 Adriana.jpg| | |||
</gallery> | |||
<gallery caption="Spider"> | |||
File:spider1 Adriana.jpg| | |||
File:spider2 Adriana.jpg| | |||
File:spider3 Adriana.jpg| | |||
File:spider4 Adriana.jpg| | |||
File:spider5 Adriana.jpg| | |||
</gallery> | |||
<gallery caption="Silberbeere, schuppenhaar"> | |||
File:silberbeere1 Adriana.jpg| | |||
File:silberbeere2 Adriana.jpg| | |||
File:silberbeere3 Adriana.jpg| | |||
File:silberbeere4 Adriana.jpg| | |||
File:silberbeere5 Adriana.jpg| | |||
</gallery> | |||
<gallery caption="Tulip"> | |||
File:tulip1 Adriana.jpg| | |||
File:tulip2 Adriana.jpg| | |||
</gallery> | |||
==Final project== | |||
<blockquote> '''''“Man is a microcosm, or a little world, because he is an extract from all the stars and planets of the whole firmament, from the earth and the elements; and so he is their quintessence.”''''' Paracelsus </blockquote> | |||
<blockquote> '''''“Therefore, we may consequently state that: this world is indeed a living being endowed with a soul and intelligence... a single visible living entity containing all other living entities, which by their nature are all related.”''''' Plato, Timaeus</blockquote> | |||
===Drawing with light=== | |||
For the Greeks, the shadow was a metaphor for the soul. They thought it was possible to recognize the soul of a man by looking at his shadow. | |||
The aim of this Project is to try to bring together science and art by looking at different samples or specimens, natural or artificial, through the microscope and then by the enlargement of the original images –exploring the effects of light in relation to the objects-, create a macrocosm from a microcosm. | |||
<blockquote>''Macrocosm and microcosm is an ancient Greek Neo-Platonic schema of seeing the same patterns reproduced in all levels of the cosmos, from the largest scale (macrocosm or universe-level) all the way down to the smallest scale (microcosm or sub-sub-atomic or even metaphysical-level). In the system the midpoint is Man, who summarizes the cosmos.''</blockquote> | |||
I will start selecting some images that I captured with the microscope. I will simplify the shapes and cut them to use it as a stencil. After collecting some stencils I will place them inside a cube and use a source of light to reflect their shadows on different walls. | |||
To do this, I will build two boxes (cubes), one of them with translucent walls. | |||
The translucent box will work as a canvas to draw all the different shadows reflected there. I will try to capture the soul of the specimens bringing it from the smallest scale, to the midpoint –cosmos–; having as a result, a new landscape on each wall. | |||
The second box will work as a lamp. I will cut out each side with the pattern I got from the first box. When turning it on, the shadows will appear everywhere in the room, bringing the soul of the collected specimens from the midpoint to a largest scale –macrocosm. | |||
The experiment will work as a microscope by itself, enlarging souls. | |||
[[Image:shadow wall web.jpg|400px|thumb|left|Shadow]] | |||
<br clear="all" /> | |||
==Simplifying shapes & making stencils== | |||
<gallery> | |||
File:docu final 1.jpg| | |||
File:docu final 2.jpg| | |||
File:docu final 3.jpg| | |||
</gallery> | |||
==Shadows== | |||
<gallery> | |||
File:docu final 4.jpg| | |||
File:docu final 5.jpg| | |||
File:docu final 6.jpg| | |||
</gallery> | |||
==Inspiration== | |||
I saw an exhibition last month in Mexico, the pieces [http://www.youtube.com/watch?v=M-NMwnToWwE shown in the video] are like portraits of a microscopic world. The artist's name is Fernando García Correa. | |||
==Box of light== | |||
<gallery> | |||
File:lampara final 1.jpg | |||
File:lampara final 2.jpg | |||
File:lampara final 3.jpg | |||
File:lampara final 4.jpg | |||
File:lampara final 5.jpg | |||
File:lampara final 6.jpg | |||
File:lampara final 7.jpg | |||
File:lampara final 8.jpg | |||
File:lampara final 9.jpg | |||
File:lampara final 10.jpg | |||
File:lampara final 11.jpg | |||
File:lampara final 12.jpg | |||
File:lampara final 14.jpg | |||
File:lampara final 15.jpg | |||
File:lampara final 17.jpg | |||
File:lampara final 18.jpg | |||
File:lampara final 19.jpg | |||
File:lampara final 20.jpg | |||
File:lampara final 21.jpg | |||
File:lampara final 22.jpg | |||
File:lampara final 23.jpg | |||
File:lampara final 24.jpg | |||
File:lampara final 25.jpg | |||
File:lampara final 26.jpg | |||
File:lampara final 27.jpg | |||
File:lampara final 28.jpg | |||
File:lampara final 29.jpg | |||
File:lampara final 30.jpg | |||
File:lampara final 31.jpg | |||
</gallery> | |||
Latest revision as of 21:13, 28 May 2013
How to transform a USB Webcam into a microscope?
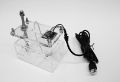
Microscopy stage
One of the first steps is to work on the design of the stage to fix the microscope.
It is important to make the drawing in the right scale. For my design, I took up the idea from the origins of the microscope where the eyepiece, the lenses and the arm are on top and the light, the aperture and the object are on the lower part.
In this case, the lens is placed on a platform that can be moved up and down trough a threaded rod. This rod is fixed with nuts to the stage. The base consists in a kind of box with a hole to put the slide, which contains the object.
Microscope

Taking pieces apart
The disassembly of the camera is not an easy task. All the pieces have to be removed, including the LEDs (unsolder), until only the PCB is left.

Without lens

Removing the cover

Unsoldering LEDs
Disassembled camera


Turning the lens
The lens has to be inverted and fixed to the PCB.

Fixing with a hot glue gun

Removed pieces

PCB


3D Model
During the whole design process some small changes were made. An example of this is the platform slot, which allows the movement in every direction, also the size of the aperture and later the small pieces to hold the slide.
The 3D Model shows different views of the prototype.

3D view

Four views


Download Media:Micro.zip
Cardboard Model
The best way to know if the prototype works is to build an actual size model.
I used model making cardboard because is cheap and excellent material. You will also need some kind of adhesive, a cutter, screws, nuts (butterfly, hex, cap), a threated rod, washers and a small piece of acrylic.
Cardboard model
Cardboard model


Laser cut
I decided to use Acrylglas for the final design. Because of the material and the size of the pieces, it was necessary to use a laser-cutting machine.

Download: Media:laser cutting Adriana 2.pdf

Laser cut parts

Materials & tools

Materials & tools

Assembling


Acrylglas Model

Final stage

Final stage
Camera & stage


Images
- Fly


- Scuff


- Mildew


- Weed


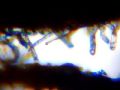


- Ginger


Video
<videoflash type=vimeo>54254808|640|480</videoflash>
Example
Images II
- Spider web


- Spider
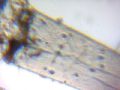
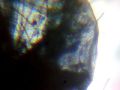


- Silberbeere, schuppenhaar


- Tulip


Final project
“Man is a microcosm, or a little world, because he is an extract from all the stars and planets of the whole firmament, from the earth and the elements; and so he is their quintessence.” Paracelsus
“Therefore, we may consequently state that: this world is indeed a living being endowed with a soul and intelligence... a single visible living entity containing all other living entities, which by their nature are all related.” Plato, Timaeus
Drawing with light
For the Greeks, the shadow was a metaphor for the soul. They thought it was possible to recognize the soul of a man by looking at his shadow.
The aim of this Project is to try to bring together science and art by looking at different samples or specimens, natural or artificial, through the microscope and then by the enlargement of the original images –exploring the effects of light in relation to the objects-, create a macrocosm from a microcosm.
Macrocosm and microcosm is an ancient Greek Neo-Platonic schema of seeing the same patterns reproduced in all levels of the cosmos, from the largest scale (macrocosm or universe-level) all the way down to the smallest scale (microcosm or sub-sub-atomic or even metaphysical-level). In the system the midpoint is Man, who summarizes the cosmos.
I will start selecting some images that I captured with the microscope. I will simplify the shapes and cut them to use it as a stencil. After collecting some stencils I will place them inside a cube and use a source of light to reflect their shadows on different walls.
To do this, I will build two boxes (cubes), one of them with translucent walls.
The translucent box will work as a canvas to draw all the different shadows reflected there. I will try to capture the soul of the specimens bringing it from the smallest scale, to the midpoint –cosmos–; having as a result, a new landscape on each wall.
The second box will work as a lamp. I will cut out each side with the pattern I got from the first box. When turning it on, the shadows will appear everywhere in the room, bringing the soul of the collected specimens from the midpoint to a largest scale –macrocosm.
The experiment will work as a microscope by itself, enlarging souls.

Simplifying shapes & making stencils


Shadows


Inspiration
I saw an exhibition last month in Mexico, the pieces shown in the video are like portraits of a microscopic world. The artist's name is Fernando García Correa.


