m (→Workflow) |
m (→Workflow) |
||
| Line 4: | Line 4: | ||
==Workflow== | ==Workflow== | ||
The first step is to download the [[Media:Vorlage Laserschnitt.ai.zip|Illustrator template]]. Open the template in Adobe Illustrator and you will see your work area, which is the maximum size of material you can use | The first step is to download the [[Media:Vorlage Laserschnitt.ai.zip|Illustrator template]]. Open the template in Adobe Illustrator and you will see your work area, which is the maximum size of material you can use with the Universities laser cutter. All of your designs need to be inside of this white rectangular box. Your lines should be set at 0.25pt thickness. | ||
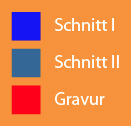
[[File:schnitt_I_II_gravur.jpg| Line colors for Illustrator template, Schnitt I, Schnitt II, Gravur]] | [[File:schnitt_I_II_gravur.jpg| Line colors for Illustrator template, Schnitt I, Schnitt II, Gravur]] | ||
Revision as of 00:20, 12 April 2013
Many projects require intricately designed parts that would be impossible to make with normal lathing and machining techniques. Laser cutters can make very precise cuts without warping or destroying nearby material, allowing for very elaborate designs.
A laser cutter is a device that uses a focused beam of light to melt or burn through a target material. Laser cutters are computer-controlled to maintain precision. Some things to keep in mind if you are considering using the laser cutter; non-melting materials such as balsa wood will have scorched edges that can be aesthetically undesirable. Laser cutters generally have a margin of error of .001 inches.
Workflow
The first step is to download the Illustrator template. Open the template in Adobe Illustrator and you will see your work area, which is the maximum size of material you can use with the Universities laser cutter. All of your designs need to be inside of this white rectangular box. Your lines should be set at 0.25pt thickness.
"Gravur" (red) is the first stage - this will not create actual cuts but can be used to add text, labels, patterns or other engravings. "Schnitt I" (navy blue) is the first cut the machine will make. "Schnitt II" (baby blue) is the 2nd cut the machine will make. Keep this order in mind as your design your layout because you cannot make cuts on areas that have already been cut out by the first cut. An example of what to cut with the "Schnitt I" would be cutting out things like small holes or squares in the design, "Schnitt II" would then cut out the object that has the holes inside of it.
Another thing to keep in mind as you layout your design in the template is that the machine will cut your lines (according to the color) in the order that you draw them in Illustrator - so you either need to draw the design in that order or cut and paste them in the correct order from another file. Also, to be more efficient with your time you should place all of your pieces side by side and only include 1 line for pieces that are the same size and touching each other. For example; if you are cutting 2 squares, they should be placed side by side and the line that touches in the middle should only exist one time - so it is an open square with 3 sides and a complete square with 4 full sides. If you don't design like this the laser cutter will literally cut both instances of this line because it is following your lines exactly and it is not smart enough to simply create a single cut when lines overlay each other.
Material
The University laser cutter supports 2 types of material; balsa wood and plexiglass. The maximum thickness of balsa wood is 1.5mm and the maximum width of plexiglass is 2mm.
To get the maximum value from your session you should try to fill your entire working area with material and make the design with the least amounts of cuts necessary for a faster cut. The cost is based on time.
Files
Links
- Neat inspiration and tutorials on the Ponoko blog
- Some in depth information on the kerf
- General tips on optimizing drawings for laser cutting
- Snug joints in acrylic
- How to make snug fittings in plywood
