Betulpeker (talk | contribs) No edit summary |
Betulpeker (talk | contribs) No edit summary |
||
| Line 39: | Line 39: | ||
background (255); // make a white background. You can also put this in DRAW to refresh your canvas every draw loop. | background (255); // make a white background. You can also put this in DRAW to refresh your canvas every draw loop. | ||
} | } | ||
void draw() { | void draw() { | ||
//*** experiment here to visualize your sensor data! | //*** experiment here to visualize your sensor data! | ||
//*** use the variable – rawSensorData – to change things according to sensor changes. | //*** use the variable – rawSensorData – to change things according to sensor changes. | ||
// for example: | // for example: | ||
//float mappedData = map (rawSensorData, 0, 1023, 0, 255); | //float mappedData = map (rawSensorData, 0, 1023, 0, 255); | ||
background (r,g,b); | background (r,g,b); | ||
} | } | ||
// this is the serial function that runs constantly in the background of your program | // this is the serial function that runs constantly in the background of your program | ||
// it allows you to use the incoming data in the draw() function, you do not need to change this. | // it allows you to use the incoming data in the draw() function, you do not need to change this. | ||
| Line 61: | Line 57: | ||
println (incomingData); | println (incomingData); | ||
myPort.clear(); // clear the serial port for receiving new data | myPort.clear(); // clear the serial port for receiving new data | ||
} | } | ||
/* | /* | ||
HELP: FINDING THE CORRECT USB PORT | HELP: FINDING THE CORRECT USB PORT | ||
if you can not find your arduino USB port, make a new file and add this code: | if you can not find your arduino USB port, make a new file and add this code: | ||
* CODE START * | * CODE START * | ||
import processing.serial.*; | import processing.serial.*; | ||
| Line 73: | Line 66: | ||
printArray(Serial.list()); | printArray(Serial.list()); | ||
* CODE END * | * CODE END * | ||
It will print out a list of all your USB connections. | It will print out a list of all your USB connections. | ||
Find the [ ] number for your Arduino Port and include it in line 8 of this code. | Find the [ ] number for your Arduino Port and include it in line 8 of this code. | ||
*/ | */ | ||
Revision as of 00:07, 5 January 2022
Experiment 1 // Processing + Arduino
Experiment 2 // Photointerrupter + Arduino
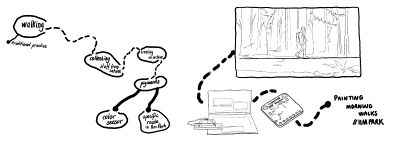
Memory of Ilm Park
Key words:
+walking +routine +pigment +collecting +archive +nature +memory
Project Idea:
An Arduino with a color sensor records the data and this data (variety of pigments) will be use for to paint morning walks at Ilm Park. A color will be archived while walking every morning on the specific route determined in the park.
Code:
import processing.serial.*; // import Serial library Serial myPort; // Create object from Serial class String incomingData = null; // create String "text" variable for incoming arduino data float rawSensorData = 0; // create float "number" variable for incoming arduino data float r,g,b; void setup() {
 size(800, 800);                             // define the size of the canvas
 String portName = Serial.list()[3];         // define the serial port. change the number in [] to a 1 or 2 etc. to match your Arduino USB port.
 myPort = new Serial(this, portName, 9600);  // create new serial object with baud rate (USB-speed) 9600 (must be the same in arduino!!!)
 myPort.bufferUntil('\n');                   // receive data until new line character comes up
 background (255);                           // make a white background. You can also put this in DRAW to refresh your canvas every draw loop.
} void draw() { //*** experiment here to visualize your sensor data! //*** use the variable – rawSensorData – to change things according to sensor changes. // for example: //float mappedData = map (rawSensorData, 0, 1023, 0, 255); background (r,g,b); } // this is the serial function that runs constantly in the background of your program // it allows you to use the incoming data in the draw() function, you do not need to change this. void serialEvent(Serial myPort) {
 incomingData = myPort.readString();         // read the incoming data as String and save it in the "incomingData" variable
 r = float(trim(incomingData.split(" ")[0]));
 g = float(trim(incomingData.split(" ")[1]));
 b = float(trim(incomingData.split(" ")[2]));
 //rawSensorData = float(trim(incomingData));  // clean the incoming data String and convert it to a float data type (a number)
 //println (rawSensorData);                    // print the data to the console for inspection
 println (incomingData);
 myPort.clear();                             // clear the serial port for receiving new data
} /* HELP: FINDING THE CORRECT USB PORT if you can not find your arduino USB port, make a new file and add this code:
- CODE START *
import processing.serial.*; // List all the available serial ports printArray(Serial.list());
- CODE END *
It will print out a list of all your USB connections. Find the [ ] number for your Arduino Port and include it in line 8 of this code.
- /

