No edit summary |
mNo edit summary |
||
| Line 35: | Line 35: | ||
Now testing can begin. | Now testing can begin. | ||
[[File:CodeRefluxDeflux.jpg|left|1000x1000px]] | [[File:CodeRefluxDeflux.jpg|left|1000x1000px]][[File:Wiring diagram reflux deflux.jpg|left|thumb|414x414px]] | ||
[[File:Wiring diagram reflux deflux.jpg|left|thumb|414x414px]] | |||
Latest revision as of 16:52, 19 July 2024
Technical Equipment
- ESP 32 development board (Wroom)
- 2x TB6600 4A 9-42V Stepper Steppermotor Driver
- 2x 4A universal AC - DC power supply with variable voltage setting option and USB power
output (Cshare)
- 2x Nema 23 12V 4,4A, 10mm shaft (Rtelligent)
- cut up CAT6 flat cable for control signals
- various breadboard cables
- HD Mediaplayer with USB, SD playback and various AV outputs
- self built 7V stereo headphone amplifier
- 16:9 1920 x 1080p HD display on wallmount
- HDMI Cable 2m
- 2x 4 plug socket (1x white for wall, 1x black for stepper drivers)
Setup
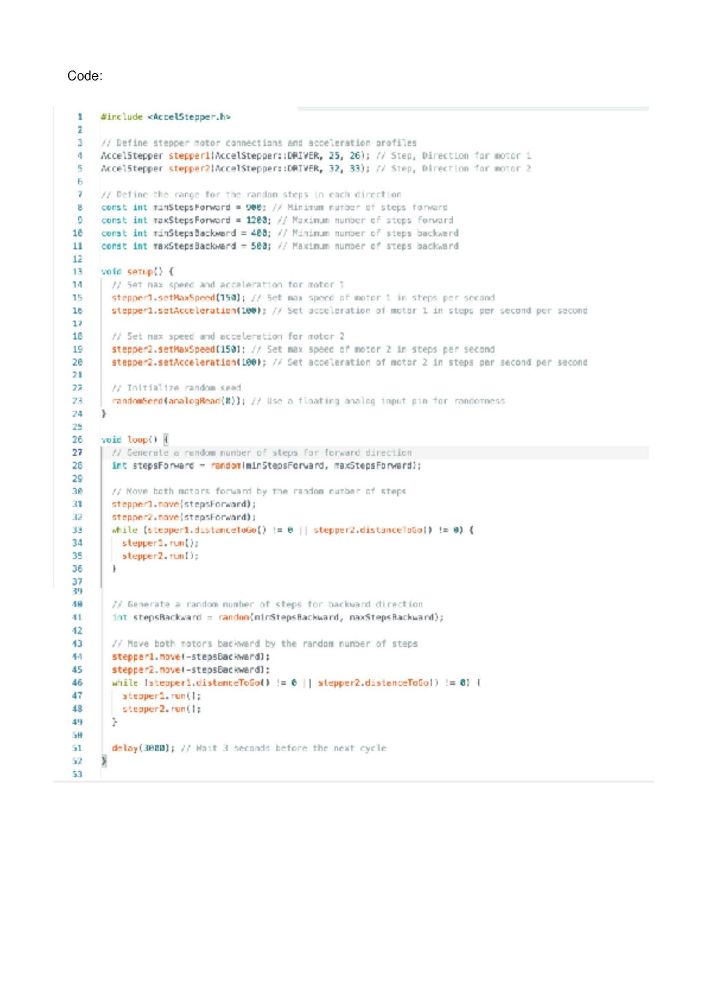
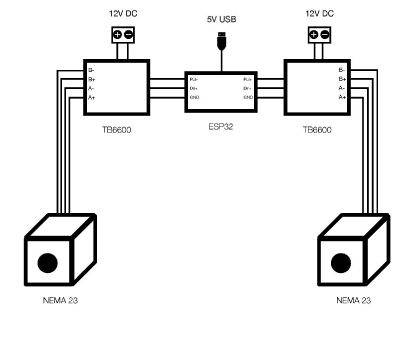
The two wooden stands are fitted with the bearing holders and the axle with the „drum“ for the rope attached in the middle at the top. The stands must be aligned properly. The chain should already be placed over the large sprocket. The motors are attached to the stands using metal clamps and positioned so that the chain has sufficient tension. The motor drivers are screwed onto both stands below the motors. All dip switches need to be turned to the off position to limit the current to 4A and set it to the highest microstepping mode. Additionally, the ESP32 board is mounted on one of the stands. Everything is then wired according to the wiring diagram. A Cat 5 cable is used to transmit
the control signals to the motor driver on the other stand (3 m distance). Next, the middle column with the two metal rings, through which the rope must be threaded, should be placed centrally between the stands. The stands should be positioned so that the rope runs parallel and does not jam in the rings. The rope is then coiled as smoothly as possible without twists and placed near the reforestation stand (-stepsBackward). After that, the rope is laid over both drums and allowed to hang down on the deforestation side (+stepsForward).The screen is mounted at eye level next to the „player box“ at a suitable spot on the wall and connected via HDMI. Finally, the headphones are connected, completing the setup.
Now testing can begin.

