Ben & Lucas OSC Game Documentation
"Give It To Me Baby"
We did a little game, where you can control a dancefloor in a Unity Scene, with microphone input. The player is requested to shout, beatbox or clap in front of the microphone, to move the dancers on the screen.
An audio signal is grabbed in Max/Msp and then sent to Unity via OSC. In Unity the signal is used to control an object, which serves as the dance-floor for some SpriteAnimation of Dancers. When the floor moves the dancers get kicked around.
When you start the game, there is music but no beat. You have the control over the beat. When you start using the mic, the beat is un-muted. When you stop interacting, the message - "Give It To Me Baby!" - appears, which forces you to go on.
- -
Max/Msp
Grabbing the Audio Input
In Max you can grab any audio input. In our case we use a microphone connected to an audio interface.
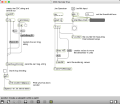
The audio signal is then converted into a float value stream. With a threshold patch, we can set the minimum of input to trigger a bang. The bang from the threshold we then send to a message box, containing a predefined OSC message string ( /goOnBang $1 ).
When a peak is detected, the Max patch also sends a message ( /Ben/x $1 ) to Unity via OSC. "$1" is a variable which is replaced by a float "1.3". This value is defines the amount of height, and therefore how high the dancefloor gets lifted.
Setting the threshold
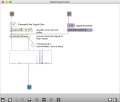
To use a constant audiostream, and trigger things with it, you need something called "Envelope Follower". Therefore we used a sub-patch which comes with to standard max-externals. This patch detects peaks in the audio-signal, if you want to use a peak above a certain level you have to look at the gain and set the threshold then.
Trigger Text and Mute Audio Sources in Unity
We use the detected peaks in the mic signal, to trigger messages and mute the beat-loop in Unity. Therefore we send the OSC message ( /goOnBang $1 ) to the PC running Unity, via OSC. When the player pauses for 350ms, the beat-loop stops, and the message - "Give It To Me Baby" - appears on the screen. When another peak is detected, the Max patch sends a signal to Unity, which tells it to go on, with playing the beat-loop and the message on the screen disappears.
---
Unity
Creating Sprite Animations
In order to create a sprite animation we used an open source tool called "Aseprite". It's like Photoshop but more intuitive when it comes to pixel art. Its easy to work with and also provides a good way for frame by frame animation. IMPORTANT: Export the file as a PNG before you Import it into Unity as in the example above.
Preparing the Sprites in Unity
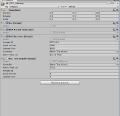
Import the png into Unity. Your settings should look like in the example above. Use "multiple" for "Sprite Mode". The most important thing is to set the "Filter mode to Point". If you miss that part your sprites will get blurry because Unity tries to smooth things out like in Photoshop for example. Click on apply to save all the settings. Once you are done go into the "Sprite Editor" tab. Now you can Trim the sprite by selecting the height and with you chose before. E.g.: 64x64. Click on apply and you are done.
Setting up the Sprites in your Scene
You can now simply drag your sprite from the Assets Folder into your Unity Scene and it will automatically create an "animation controller" and an "animation" of your sprite. As default the Animation will be stored as a loop. By pressing play your character should now play the animation you first created in "aseprite". Now your object needs a "Rigidbody" and a "Box Collider" so it can behave as a physics Object.
Create the Stage
The Spirtes needs now a stage. To prevent characters from falling down we set up some colliders arround the stage. We imported a face inverted opened cube from blender.
Setting up the Camera
For our text which appears on the screen we simply created canvas element. We set the "Render Mode" to "Screen Space - Camera" so it fits to the Maincam and attached the Main Camera object to the Canavs. In the next Step we created a "LookAt" script which gives our cam a smooth damping while the scene bumps up and down. Afterwards we attached the script to our Maincam.
OSC Setup
Step 1: Declaring private/public variables
Our main task was to animate the "Dance Floor" where the party takes place. The "gameReciever" is our Dance Floor which will be fetched from our script and get's ghis position translated afterwards. We also created a variable for our screen overlay, one for the Y position of our Dance Floor and another one for the text which will be shown when no input comes in. In the Start function we inserted one line which will find the display variable and the GameObject "Canvas" on startup to avoid the text and the canvas from disapearing.
Step 2: Update Functions
In our update function we check the values of the osc message stream. We have set up controllers for the audio source with the beat loop and also a controller to display the text and another one for moving the dance floor.
If the text isn't shown the audio volume is set to 1. if not the volume gets muted. The same thing for the text. "yPos" controls the Y coordinate of the Dance Floor.
Step 3: Parse OSC Values
in Picture 3 you can see our basic setup to retrieve the message values from max msp which will be called in the update function.
Recieve OSC Messages
In order to send messages from Max MSP to Unity we have to find out the IP of the PC/ MAC which contains the Unity Scene.
WINDOWS open cmd.exe and type in: ipconfig. Use the IPv4 values.
MAC open the terminal and type in: ifconfig. use the en0 IP.
Type in your IP in max and also the "Listener Port" you chose in Unity to set up the connection to stream the values.
if everything is set up correctly you should see the message values in the Debug Window as shown above.


