Introduction
This is a tutorial about how to control Arduino by Captury. A vibration motor will be used in Arduino as a trigger. So it’s mainly about how to control the motor by using the received data of Captury. In Arduino, there is also a small tutorial about how to trigger the vibration motor by using the photocell sensor, which is related to my project module, Wool's World.
Basically, the tutorial is divided into two parts. The first part is about the basic steps to control the vibration motor by using the photocell sensor. And for the second part which I will show you how to control it by Captury.
First Part
In this part I will show you how to use two photocells to control the on/off of two vibration motors in Arduino. The trigger was designed as if two photocells are covered by hands, then those vibration motors will vibrate simultaneously.
Hardware You Need: (for each item x2)
Photocell
Vibration Motor
Arduino Board
1N4001 Diode
0.1µF ceramic capacitor
10KΩ Resistor
2N2222 NPN Transistor
USB Connector
So how do I test if the vibration motor works well?
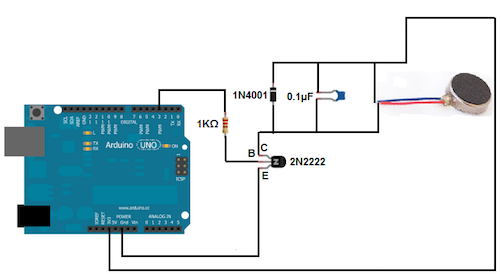
The following circuit is the basic method to test your motor without photocell:
TIPS! For this circuit you may need a 1KΩ Resistor.
The Code for Test:
(The code vibrates the motor every minute)
const int motorPin = 3;
void setup()
{
pinMode(motorPin, OUTPUT);
}
void loop()
{
digitalWrite(motorPin, HIGH);
delay(1000);
digitalWrite(motorPin, LOW);
delay(59000);
}
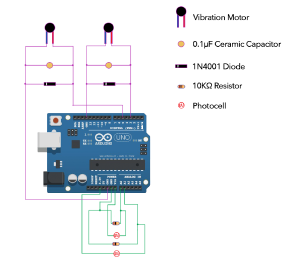
After test successfully, you can build a circuit with photocell as a following diagram:
The Code Using Photocell:
int photocellPin = 0;     // the cell and 10K pulldown are connected to A0
int photocellPin1 = 1;     // the cell and 10K pulldown are connected to A1
int photocellReading, photocellReading1;     // the analog reading from the sensor divider

void setup() {     // We'll send debugging information via the Serial monitor
  Serial.begin(9600);
  pinMode(3, OUTPUT);
  pinMode(5, OUTPUT);
}

void loop(void) {
  photocellReading = analogRead(photocellPin);
  photocellReading1 = analogRead(photocellPin1);

  if(photocellReading < 400 && photocellReading1 < 400 ){
    digitalWrite(3, HIGH);
    digitalWrite(5, HIGH);
    delay(100);
  }

  else {
    digitalWrite(3, LOW);
    digitalWrite(5, LOW);
    delay(100);
  }

  Serial.print("Analog reading1 = ");
  Serial.println(photocellReading);     // the raw analog reading1
  Serial.print("Analog reading2 = ");
  Serial.println(photocellReading1);     // the raw analog reading2
  Serial.println(" ");

  delay(10);
}
TIPS! Considering different light intensity in different environment, you may have to change the value of 'photocellReading' (Line15) if it's not work.

